Spring free-length
First to consider is valve spring free-length, that is, the length of the valve spring uninstalled. This is usually the only specification given in the OEM service manual. Its purpose from Honda's point of view is merely to enable you to easily spot fatigued springs. However, when building a high performance engine we go way beyond this, using spring free-length as the basis for calculating other important spring specifications.
Spring installed height
For example, valve spring installed height. Installed height is the height of the valve spring installed, that is, slightly compressed already. Even before the valve has moved. The purpose of knowing installed height is primarily to gauge valve seat pressure. Valve seat pressure is important in any engine, stock or modified, but the modified engine's increased cylinder pressure requires no-nonsense sealing. Also, at high rpm there is less time for valve cooling, so good seating becomes more crucial on that basis as well.
Spring full-open length
Next is the valve spring's full-open length. This is the spring's shortest working length, the hardest it can be expected to work. Among other things, knowing spring full open length helps the engine builder determine if there is sufficient spring pressure to control valve float. All performance camshafts increase how quickly the valve opens, adding to valve acceleration and making controlling valve "float" more of a concern. The spring's full-open pressure is your first line of defense against valve float, and it will often need to be more than stock.
Spring coilbind
Then valve spring coilbind. This is when the spring's coils touch one another, metal to metal. The spring is compressed past the valve's full open point. This must never occur in operation, and there's something wrong with a spring that comes near to doing so. The purpose of checking for coilbind clearance is to validate your choice of valve springs, to point out when they are not the correct rate.
Valve free travel
Then on to the valve, where we will determine its free travel, also called retainer-to-guide. This is the amount that the valve can travel from closed all the way to where the spring retainer hits the valve guide. One of the most important checks, many engine builders have failed to respect this area and have paid dearly.
Valve to piston clearance
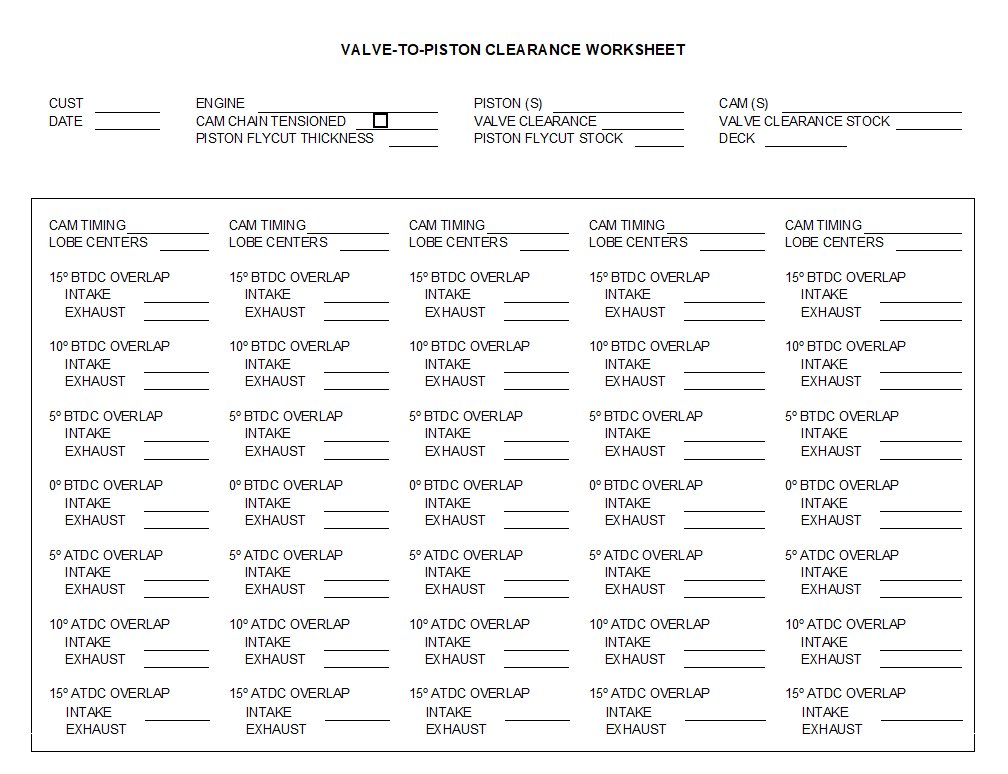
Now valve-to-piston clearance. This necessarily changes in an engine modified with a different piston or camshaft, or having machined castings almost anywhere in the top end. To do this check, carburetor springs are put in place of the valve springs. A degree wheel on the crankshaft and a dial indicator on the valve tell us how much the valve moves at a point 30 degrees either side of TDC overlap, the danger zone, in 5 degree steps. This is unarguably the most important of all hot rod engine building clearance checks. Don't believe what the high performance parts retailers tell you. It's your engine, find out for yourself. The image below is a facsimile of the worksheet I use for this.
Valve to valve clearance
Valve-to-valve clearance is also important, particularly on older engines having old-school, hemi-like valve angles. This is typically checked by passing a thick piece of solder through the spark plug hole at TDC overlap, though there are other methods of doing this as well.
Valve follower travel
Then valve follower travel. Whenever camming a shim and bucket engine, you must check that the bucket (follower) will in fact move the required distance. In some Asian cylinder heads, the bucket bottoms out in the casting less than 0.100" after the stock valve lift. Failure to check this will result in a considerable amount of damage, including a broken camshaft.
Valve protrusion
And finally, valve protrusion. A commonly overlooked problem in shim and bucket type engines is that of assembling the cylinder head and then finding that the smallest of the factory's shims are needed to get the valve clearances to spec, leaving no room left for future valve adjustments. This is not acceptable, yet can happen even on a head that has simply had a valve job done. The solution is to "tip" or shorten the valves 0.008"-0.010", bringing the valve protrusion back down to factory spec, and allowing the middle size shims to be used for valve adjustment.
Naturally, there are several other "gotchas" to look out for, such as clearance of a larger cam's lobe with engine castings, rocker arm interference, and a few others. Hopefully it is clear that only a very naive individual "throws" a cam at an engine. And as a footnote, these things can indeed be relative to the GL1000 and GL1100. Jim Dour, the original owner of Megacycle, started with the GL1000 and was a fan of the bike.
Next post: Cams, cam chains, tensioners, springs, and bearings