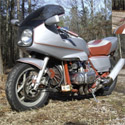
(don't) Flip This Bike!
Moderators: Brant, Sagebrush, Forum Moderators
-
CYBORG
- Moderator

- Posts: 24943
- Joined: Mon Jan 14, 2008 12:52 pm
- Location: Muskegon mich
Re: (don't) Flip This Bike! the Resurrection
we didn't get to talk to much at the meet, with everything that was going on. but i really was happy to see you back on the bike. and the bike does look great. hope to have some time to sit down with you at vintagedays......or the east coast rally.
1978 custom GL1000
1977 custom with 1200 engine
1985 gl1200
1977 custom with 1200 engine
1985 gl1200
-
Roady

- Member Relations &_Graphics

- Posts: 11957
- Joined: Wed Jun 20, 2007 2:35 pm
- Location: Port St. John, FL
Re: (don't) Flip This Bike! the Resurrection
Today I finally bit the bullet and removed my errant screeching speedometer. I pried open the case to find out what could be done about it.
A few years ago I received a broken speedo from Brant. The trip meter stem was broken off and the wheels wouldn't turn. The guts from the trip meter of the original went into Brant's and that all went back into the original's case.
I pried open the ring and did not cut it. (Full disclosure in my Speedometer/Tachometer, an Open & Shut Case How-To thread.)
And it only cost me a little under 8,000 miles.
The original:
Franken-Speedo:
-
polkadot
- True Blue Steel Biker

- Posts: 2400
- Joined: Mon Jul 06, 2009 10:04 pm
- Location: Curtice, Ohio
Re: (don't) Flip This Bike! the Resurrection
I am checking the Illinois statutes right now to see if tampering with on odometer includes setting it AHEAD?! . . . . . . I see no case law. Roady is apparently the only one that ADDS miles to his bike without riding it!
Hope for the best, expect the worst and take what comes!
1977 Candy Sirus Blue Wing (gone but not forgotten!): Ernie's 77 Resto
1998 Yellow/Creme Valkyrie (sold): Valk Redo
1976 Sulfur Yellow Wing (sold): Melloyellow to live again
1976 LTD #1353 (sold): And away we go . . . . LTD style
1970 CT90 (sold): Had too much time on my hands so . . .
1/4 of 1975 Wing #898 (Sold): Team 898 - raised from the ashes
70ish Benelli Dynamo Scrambler (sold): Erector Set/Treasure Hunt aka Benelli Dynamo
1/6 of 1976 LTD #993 (Sold): LTD 993 . . . and so it begins
-
Roady
- Member Relations &_Graphics
- Posts: 11957
- Joined: Wed Jun 20, 2007 2:35 pm
- Location: Port St. John, FL
Re: (don't) Flip This Bike! the Resurrection
I did try to spin that "8" down to "0" but it wouldn't budge and din't wanna break anything else.
-
Fred Camper

- Vice President

- Posts: 7322
- Joined: Wed Aug 12, 2009 9:38 pm
- My Album: http://www.ngwclub.com/gallery/v/wingmans/Jeff+Bozeman/
- Location: Metro Detroit
- Contact:
Re: (don't) Flip This Bike! the Resurrection
Not worth the effort to fix, these bikes love the miles anyway. What they do not like is to sit.
Proud member of the NGW Cartel (Rochester MI)
1977 GL1000 BADDOG (April 2012 BOTM)
1976 LTD - '993 LTD...and so it begins'
You should remember that it's peace of mind you're after and not just fixing the machine. R.Pirsig
1977 GL1000 BADDOG (April 2012 BOTM)
1976 LTD - '993 LTD...and so it begins'
You should remember that it's peace of mind you're after and not just fixing the machine. R.Pirsig
-
Roady
- Member Relations &_Graphics
- Posts: 11957
- Joined: Wed Jun 20, 2007 2:35 pm
- Location: Port St. John, FL
Re: (don't) Flip This Bike! the Resurrection
Cool.
Now if I could just figure out why the darn rear air pressure warning light is on. AAaaarRRRgggh! Pressure is at 56 (max is 57), I removed the unit, disassembled it, cleaned it out ... light still on. But progress anyway, I unplugged it and it's still on so it must be in the wiring somewhere. The last thing I did was install all new bulbs in the gauges so maybe I loosened or unplugged something in the tach. Drat! I just don't want to have to remove the screen, headlight bucket (I did look inside but could not find an errant wire), and tach again. That's getting old.
Maybe a strategically placed piece of black electrical tape will suffice.
I am seriously working on turning my nekkid into a bagger. GASP! I'll have to edit my sig. Picked up some Interstate bag frames from Britman a few days ago and Oldewing is in the process of shipping me a set of bags. Got the color formula for Candy Muse Red at NAPA today to paint the replacement left side cover and the bags. The primer, fixer, color and clear looks like it's going to run me close to $150 but those things gotta match. This adventure just continues.
Now if I could just figure out why the darn rear air pressure warning light is on. AAaaarRRRgggh! Pressure is at 56 (max is 57), I removed the unit, disassembled it, cleaned it out ... light still on. But progress anyway, I unplugged it and it's still on so it must be in the wiring somewhere. The last thing I did was install all new bulbs in the gauges so maybe I loosened or unplugged something in the tach. Drat! I just don't want to have to remove the screen, headlight bucket (I did look inside but could not find an errant wire), and tach again. That's getting old.
Maybe a strategically placed piece of black electrical tape will suffice.
I am seriously working on turning my nekkid into a bagger. GASP! I'll have to edit my sig. Picked up some Interstate bag frames from Britman a few days ago and Oldewing is in the process of shipping me a set of bags. Got the color formula for Candy Muse Red at NAPA today to paint the replacement left side cover and the bags. The primer, fixer, color and clear looks like it's going to run me close to $150
-
Rat

- Photo Gallery Admin

- Posts: 15847
- Joined: Fri Oct 21, 2005 9:59 pm
- My Album: https://www.ngwclub.com/gallery/v/wingmans/rat/
- RIP: cookie, KyPM, Roady
- Location: Toronto .... Canada
Re: (don't) Flip This Bike! the Resurrection
"Maybe a strategically placed piece of black electrical tape will suffice. "
Used to work for me, but the real fix was new progressive 412s.
Gord
Used to work for me, but the real fix was new progressive 412s.
Gord
"I'd rather Ride than Shine"
‘14 KLR650 ... not a rat ... yet
‘84 GL1200i ‘R2B6' (Rat to Be 6, the last, adopted by twowings)
My Original 'RAT' was a hybrid '82 CB900/1100F
‘14 KLR650 ... not a rat ... yet
‘84 GL1200i ‘R2B6' (Rat to Be 6, the last, adopted by twowings)
My Original 'RAT' was a hybrid '82 CB900/1100F
-
Roady
- Member Relations &_Graphics
- Posts: 11957
- Joined: Wed Jun 20, 2007 2:35 pm
- Location: Port St. John, FL
Re: (don't) Flip This Bike! the Resurrection
First off, when I replaced the dash bulbs recently, a nasty  li'l gremlin jumped in and helped out by switching one of the Tach's illuminator bulbs with the rear shock pressure warning light. Pretty much explains why that light would not go out. But, I did manage to R&R the switch/Schrader by the rear master and traced all of the wires and dielectric greased a whole bunch of connectors in the process. WIN
__________________________________________
The incandescent bulbs from Alwing17 via Oldewing have been replace with LED bulbs. Specifically "BA9S 1SMD 5050 Car LED Indicator Light C5W Interior" that I found on eBay China. The cost was significant ... $5 shipped ... and you can order them from this seller. They came loose packed in a bubble wrap envelope. Not much for feedback from him but the bulbs arrived in about 10 days.
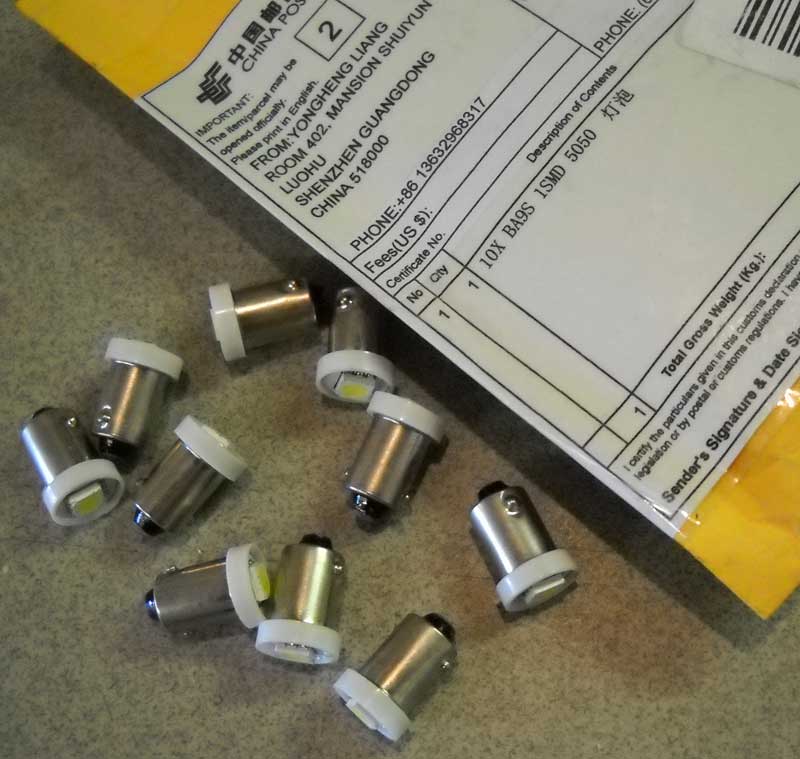
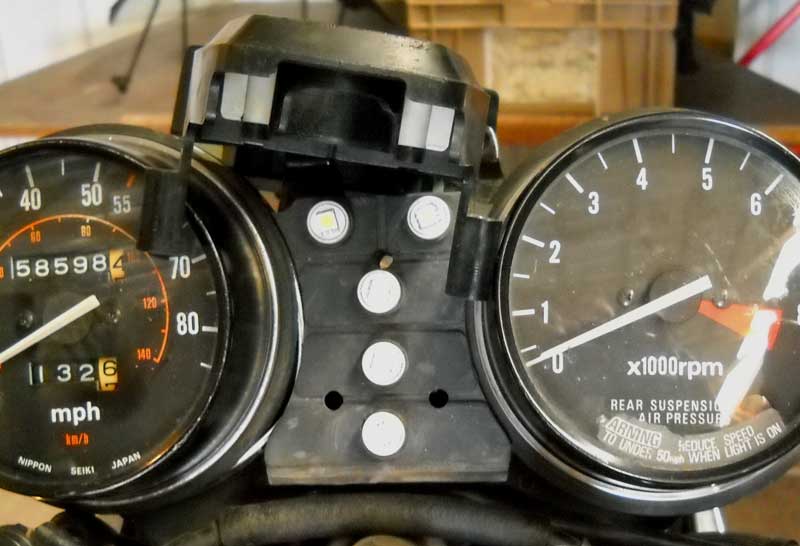
Getting to the bulbs is simple on the nekkid Wing. For the center console, remove the top two Phillips screws from the front of the panel. Remove the two Phillips screws from the rear of the panel (they're tucked in on both sides of the key switch). Lift off the front panel and you're in.
Disclaimer for Interstate/Aspencade/Vetter(etc.) owners. You're probably going to have to remove the fairing. But you may be able to get in there without doing that. If you've got a windscreen, that's gotta go too.
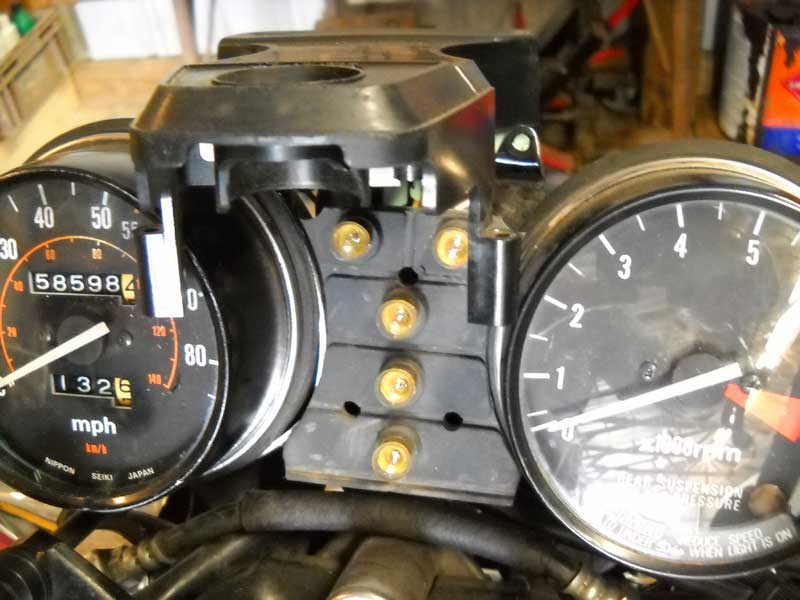
Replace the incandescents with your new LEDs. The pack contains 10 bulbs but the GL1100 needs 11 to completely do the job. However, they are MONDO BRIGHT so I chose to leave one of the stock bulbs in place for the brights indicator, 2nd from the bottom. That's not shown in this shot 'cuz I hadda take it apart again to switch it out. Good choice ... at night it was already way too bright.
Comparing the two flasher indicators. (Sorry about that right side pic, I was so excited that I must have been shaking in my boots, err, sneakers.)
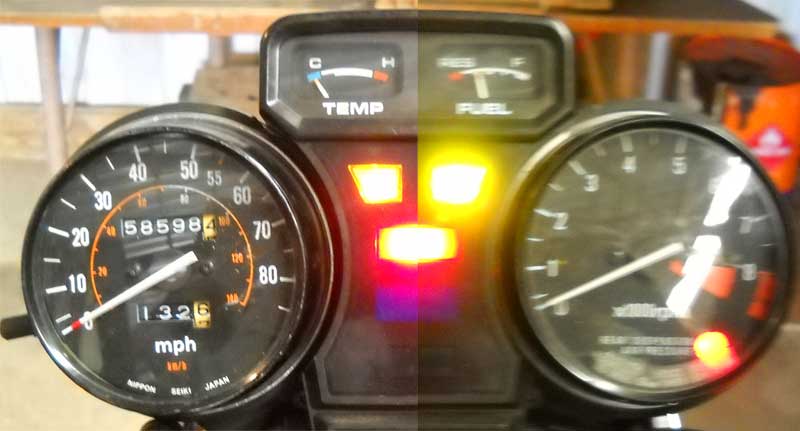
Of course, we gotta have yellow-pointy-fingers and a full description with a paragraph on the back of each one.
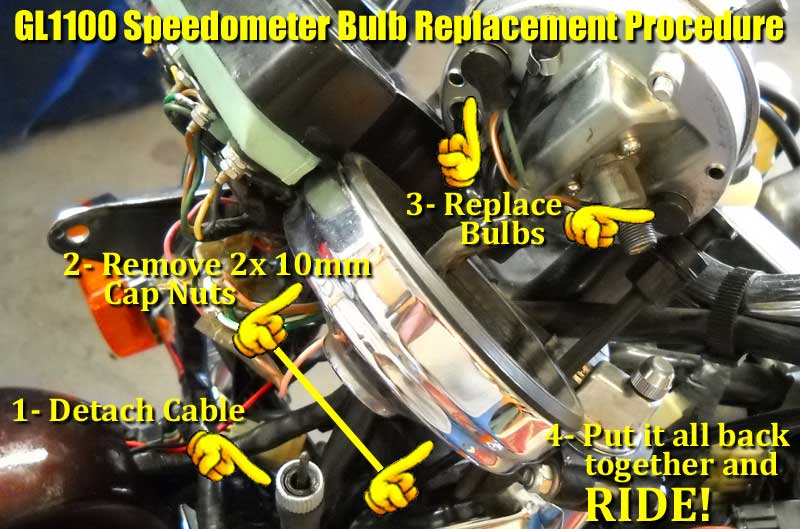
This is really simple and extremely cheap. I even found a site that sells them in 100 lots for around a quarter apiece. But, I wasn't quite up to committing to that HUGE of an investment without trying it out first.
__________________________________________
The incandescent bulbs from Alwing17 via Oldewing have been replace with LED bulbs. Specifically "BA9S 1SMD 5050 Car LED Indicator Light C5W Interior" that I found on eBay China. The cost was significant ... $5 shipped ... and you can order them from this seller. They came loose packed in a bubble wrap envelope. Not much for feedback from him but the bulbs arrived in about 10 days.
Getting to the bulbs is simple on the nekkid Wing. For the center console, remove the top two Phillips screws from the front of the panel. Remove the two Phillips screws from the rear of the panel (they're tucked in on both sides of the key switch). Lift off the front panel and you're in.
Disclaimer for Interstate/Aspencade/Vetter(etc.) owners. You're probably going to have to remove the fairing. But you may be able to get in there without doing that. If you've got a windscreen, that's gotta go too.
Replace the incandescents with your new LEDs. The pack contains 10 bulbs but the GL1100 needs 11 to completely do the job. However, they are MONDO BRIGHT so I chose to leave one of the stock bulbs in place for the brights indicator, 2nd from the bottom. That's not shown in this shot 'cuz I hadda take it apart again to switch it out. Good choice ... at night it was already way too bright.
Comparing the two flasher indicators. (Sorry about that right side pic, I was so excited that I must have been shaking in my boots, err, sneakers.)
Of course, we gotta have yellow-pointy-fingers and a full description with a paragraph on the back of each one.
This is really simple and extremely cheap. I even found a site that sells them in 100 lots for around a quarter apiece. But, I wasn't quite up to committing to that HUGE of an investment without trying it out first.
-
Fred Camper
- Vice President
- Posts: 7322
- Joined: Wed Aug 12, 2009 9:38 pm
- My Album: http://www.ngwclub.com/gallery/v/wingmans/Jeff+Bozeman/
- Location: Metro Detroit
- Contact:
Re: (don't) Flip This Bike! the Resurrection
Glad you tried out the 1smd, as I was about to order 5smd for the indicators and that would have been too much light. I will try using one for high beam, and diming it down with tape or paint.
Ordered up the ones for the indicators and just in the event that the 5 smd turn out to be too bright I have enough ordered to cover those too. And a 13 red smd 1157 for the taillight too.
Ordered up the ones for the indicators and just in the event that the 5 smd turn out to be too bright I have enough ordered to cover those too. And a 13 red smd 1157 for the taillight too.
Proud member of the NGW Cartel (Rochester MI)
1977 GL1000 BADDOG (April 2012 BOTM)
1976 LTD - '993 LTD...and so it begins'
You should remember that it's peace of mind you're after and not just fixing the machine. R.Pirsig
1977 GL1000 BADDOG (April 2012 BOTM)
1976 LTD - '993 LTD...and so it begins'
You should remember that it's peace of mind you're after and not just fixing the machine. R.Pirsig
-
Roady
- Member Relations &_Graphics
- Posts: 11957
- Joined: Wed Jun 20, 2007 2:35 pm
- Location: Port St. John, FL
Re: (don't) Flip This Bike! the Resurrection
I believe that the neutral indicator LED is interfering with the circuit. A few nights ago I rode home in the rain and the light kept flickering and then would go steady for a while ... at 75 mph! If I clicked on a turn signal or went to brights, that indicator would change intensity or go out for a while. Gonna go back to a stock bulb on that one now.
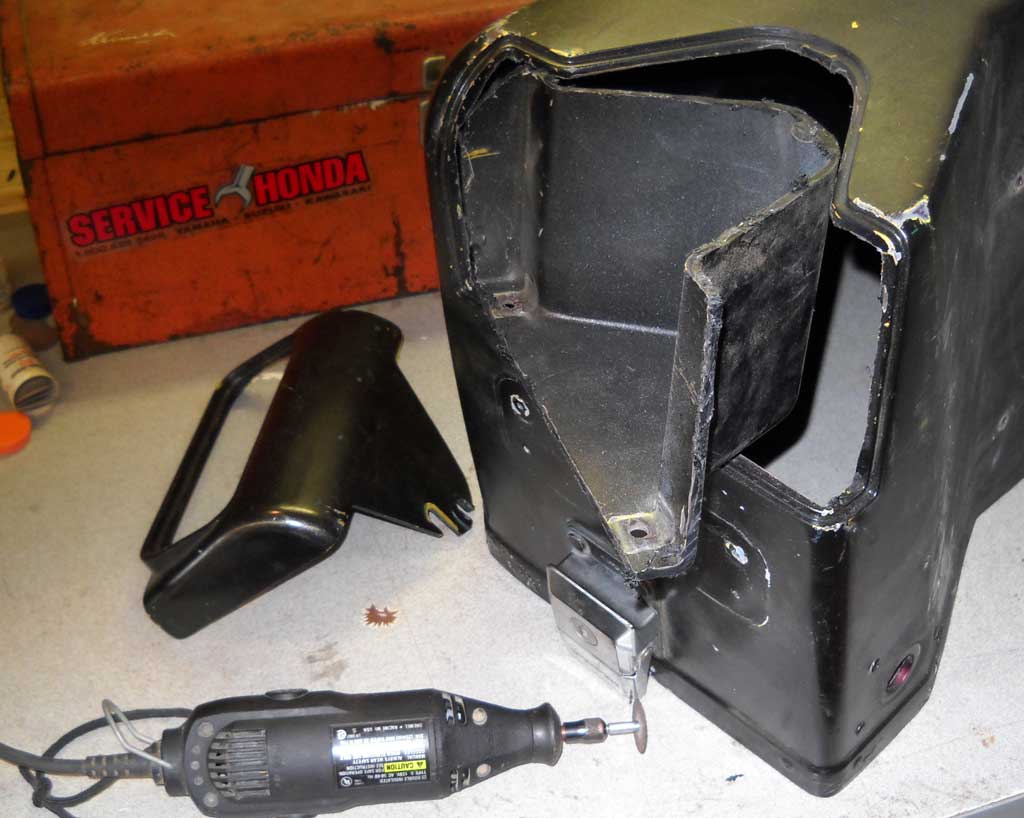
On another front ... the bags arrived from Oldewing yesterday and I dove right into them. There were a couple of cracks in base and lid of one of them and many little holes to fill in both. I'm taking off all lights, reflectors and wire holders and that leaves holes. I went to NAPA and the GoldWing guru there recommended an epoxy called "Plastic Weld" because it does the number on ABS. The stuff is strong and sets up in 3 to 4 minutes, fully sets in 24 hours. I fixed the lid yesterday as a test and saw today that I'll be able to sand it down smooth like bondo. So today I went to work on the cracked base of the one and filled all the holes in the other.
Then I cut out the indent of the bottom rear of one, that really opens up the inside of the case.
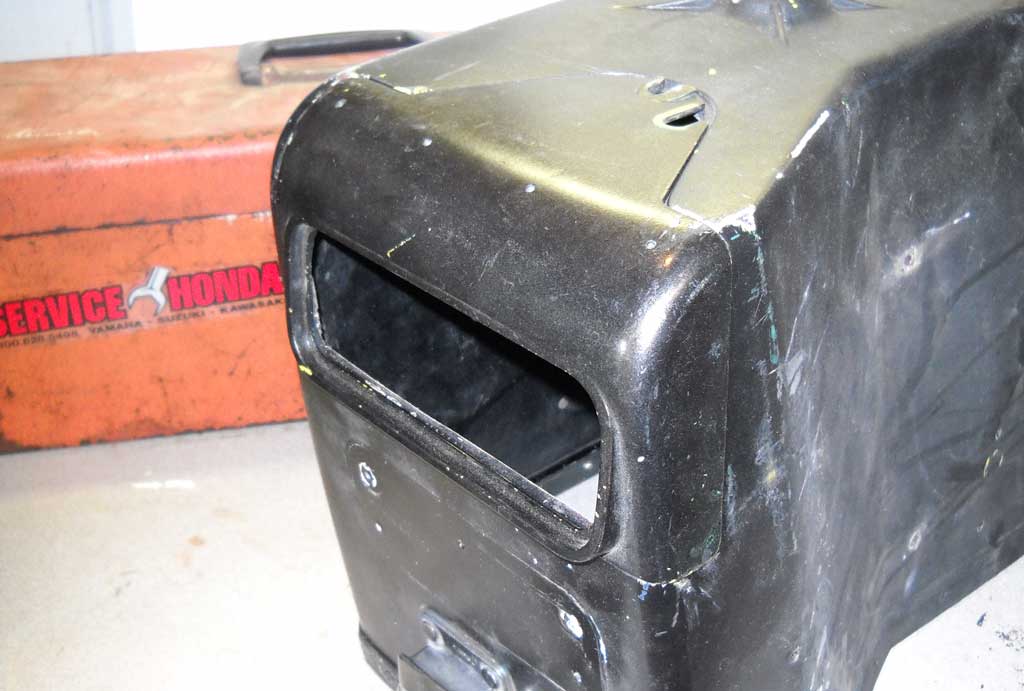
I'll fit and epoxy the original surround for the light after I trim off the rim. I want a smooth curve there. The challenge now will be for my bodyman (Stan who's trading for a li'l carb job I did for him) to fill in the gaping hole where the lens used to be.
And I had a big bonus on these bags. The latches on one were locked and I was trying to figure out how to get them loose. Finally, out of desperation, I grabbed by ignition key and unlocked them.
On another front ... the bags arrived from Oldewing yesterday and I dove right into them. There were a couple of cracks in base and lid of one of them and many little holes to fill in both. I'm taking off all lights, reflectors and wire holders and that leaves holes. I went to NAPA and the GoldWing guru there recommended an epoxy called "Plastic Weld" because it does the number on ABS. The stuff is strong and sets up in 3 to 4 minutes, fully sets in 24 hours. I fixed the lid yesterday as a test and saw today that I'll be able to sand it down smooth like bondo. So today I went to work on the cracked base of the one and filled all the holes in the other.
Then I cut out the indent of the bottom rear of one, that really opens up the inside of the case.
I'll fit and epoxy the original surround for the light after I trim off the rim. I want a smooth curve there. The challenge now will be for my bodyman (Stan who's trading for a li'l carb job I did for him) to fill in the gaping hole where the lens used to be.
And I had a big bonus on these bags. The latches on one were locked and I was trying to figure out how to get them loose. Finally, out of desperation, I grabbed by ignition key and unlocked them.
-
Fred Camper
- Vice President
- Posts: 7322
- Joined: Wed Aug 12, 2009 9:38 pm
- My Album: http://www.ngwclub.com/gallery/v/wingmans/Jeff+Bozeman/
- Location: Metro Detroit
- Contact:
Re: (don't) Flip This Bike! the Resurrection
Received my bulbs earlier this week and got them installed. If the neutral light flickers like yours, then the OEM bulb goes back in as the neutral light speeds little time on and does not need to be an led. I put in a red 12 smd 1157 bulb in the taillight and it appears near identical to the stock bulb, but the licence plate is dim due to the red led. No biggie I guess.Roady wrote:I believe that the neutral indicator LED is interfering with the circuit. A few nights ago I rode home in the rain and the light kept flickering and then would go steady for a while ... at 75 mph! If I clicked on a turn signal or went to brights, that indicator would change intensity or go out for a while. Gonna go back to a stock bulb on that one now.
Glad the bag repairs are progressing well.
Proud member of the NGW Cartel (Rochester MI)
1977 GL1000 BADDOG (April 2012 BOTM)
1976 LTD - '993 LTD...and so it begins'
You should remember that it's peace of mind you're after and not just fixing the machine. R.Pirsig
1977 GL1000 BADDOG (April 2012 BOTM)
1976 LTD - '993 LTD...and so it begins'
You should remember that it's peace of mind you're after and not just fixing the machine. R.Pirsig
-
Roady
- Member Relations &_Graphics
- Posts: 11957
- Joined: Wed Jun 20, 2007 2:35 pm
- Location: Port St. John, FL
Re: (don't) Flip This Bike! the Resurrection
Any idea what the SMD numbers indicate?
I've become pretty handy at removing the windscreen and popping the instruments and panel open.
I've become pretty handy at removing the windscreen and popping the instruments and panel open.
-
Fred Camper
- Vice President
- Posts: 7322
- Joined: Wed Aug 12, 2009 9:38 pm
- My Album: http://www.ngwclub.com/gallery/v/wingmans/Jeff+Bozeman/
- Location: Metro Detroit
- Contact:
Re: (don't) Flip This Bike! the Resurrection
SMD= Surface Mount Diode and the number is the amount of SMD's per base.
Proud member of the NGW Cartel (Rochester MI)
1977 GL1000 BADDOG (April 2012 BOTM)
1976 LTD - '993 LTD...and so it begins'
You should remember that it's peace of mind you're after and not just fixing the machine. R.Pirsig
1977 GL1000 BADDOG (April 2012 BOTM)
1976 LTD - '993 LTD...and so it begins'
You should remember that it's peace of mind you're after and not just fixing the machine. R.Pirsig
-
Fred Camper
- Vice President
- Posts: 7322
- Joined: Wed Aug 12, 2009 9:38 pm
- My Album: http://www.ngwclub.com/gallery/v/wingmans/Jeff+Bozeman/
- Location: Metro Detroit
- Contact:
Re: (don't) Flip This Bike! the Resurrection
No neutral light flickering for me with the 1SMD bulb, so I bet if you get no flicker with the incandescent bulb then the only reason is that incandescent bulbs are slow to fire. I do not think the led is the cause of the flicker.
Proud member of the NGW Cartel (Rochester MI)
1977 GL1000 BADDOG (April 2012 BOTM)
1976 LTD - '993 LTD...and so it begins'
You should remember that it's peace of mind you're after and not just fixing the machine. R.Pirsig
1977 GL1000 BADDOG (April 2012 BOTM)
1976 LTD - '993 LTD...and so it begins'
You should remember that it's peace of mind you're after and not just fixing the machine. R.Pirsig
-
Roady
- Member Relations &_Graphics
- Posts: 11957
- Joined: Wed Jun 20, 2007 2:35 pm
- Location: Port St. John, FL
Re: (don't) Flip This Bike! the Resurrection
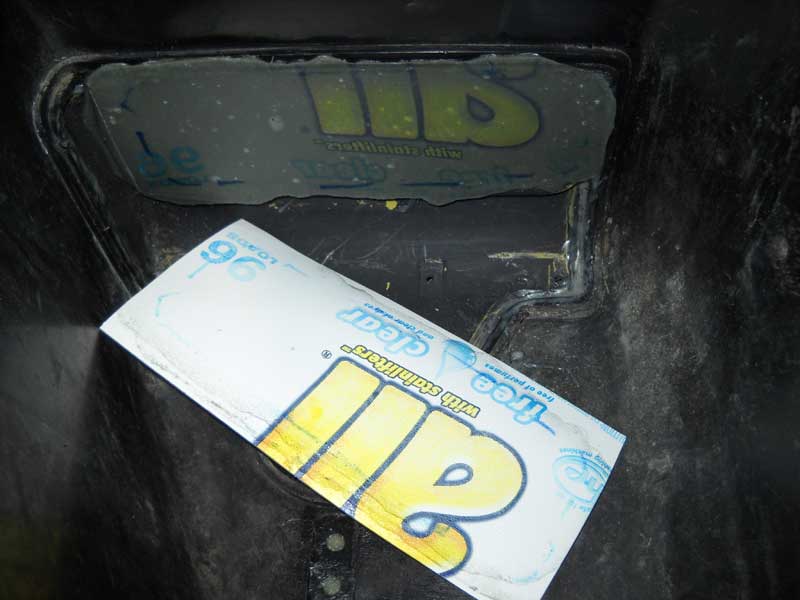
Finally ... back to work on the bags today. We've had a week of 100+ temps so it's been hard to get out. And even harder to confront this next step.
The buddy I'd been counting on to fill the bag's winker gaps was none-too-encouraging when I took them over to his place. He'd done some body work on cars but was really at a loss with this ABS stuff. But I've been reading through CrashDown's thread and was highly motivated by his most excellent instructions. Having never done any body work of any kind I gritted my teeth and took the leap, bought the needed supplies and dove into it.
A few days ago I trimmed down and glued in the winker covers with ABS cement.
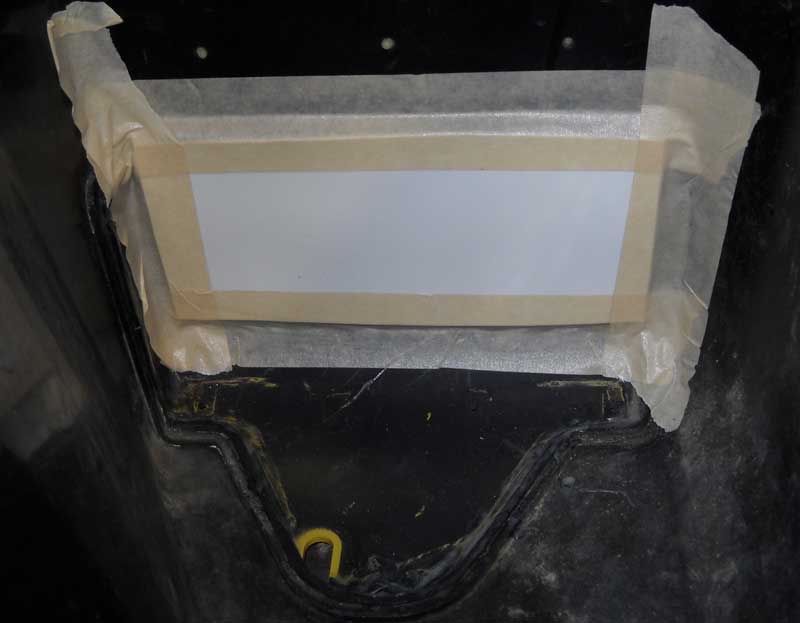
Today, I cut "custom" backer plates and taped them inside the boxes.
After stirring the Kitty Hair, out comes a 4" diameter glob onto my palette, a scrap of aluminum sheet.
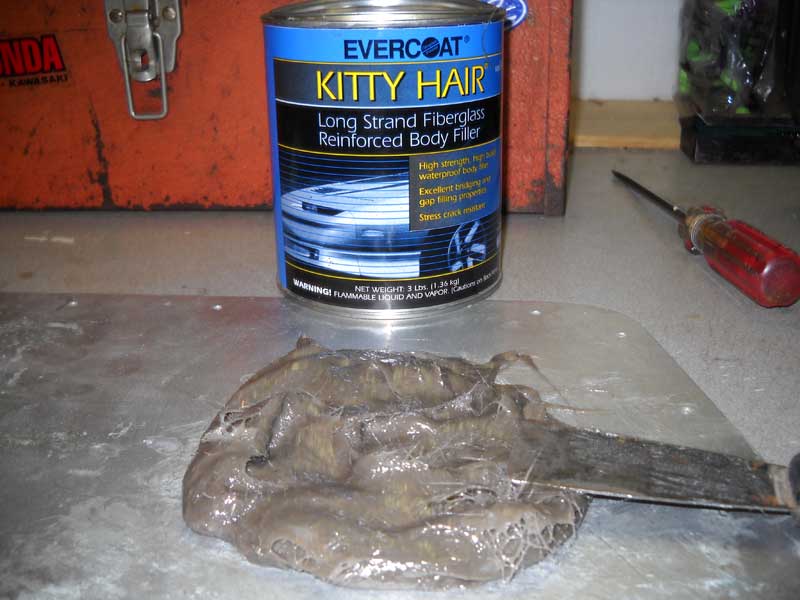
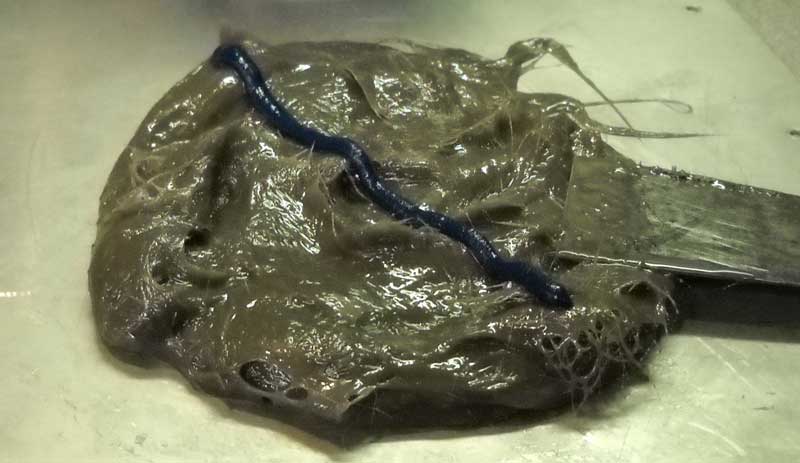
Then a line of hardener and mix it up real good.
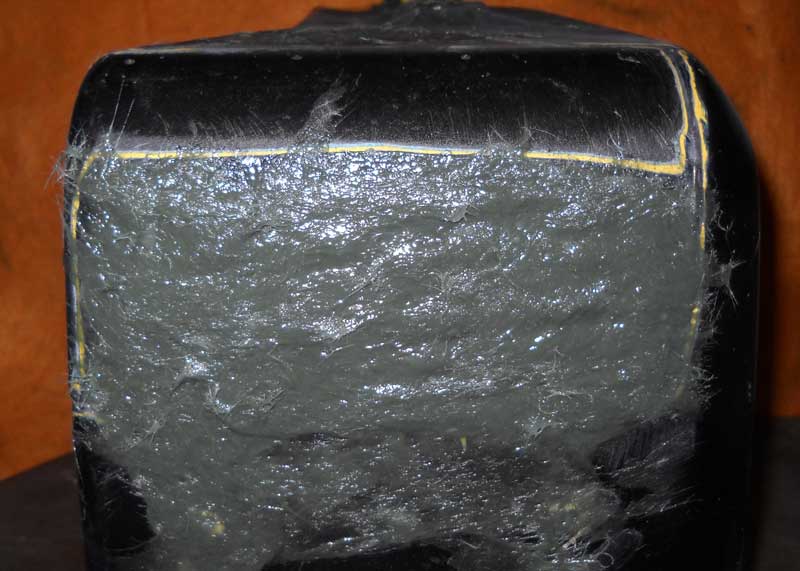
Spread the Kitty Hair into the hole making sure to press it firmly into all of the edges. A tip ... don't work it too much or the glass will work itself out. It starts to harden in about 5 minutes.
After a few minutes I peeled off the backer plate. It didn't really want to stick very well.
Then, another batch of Kitty Hair to kinda fill in the inside of the patch.
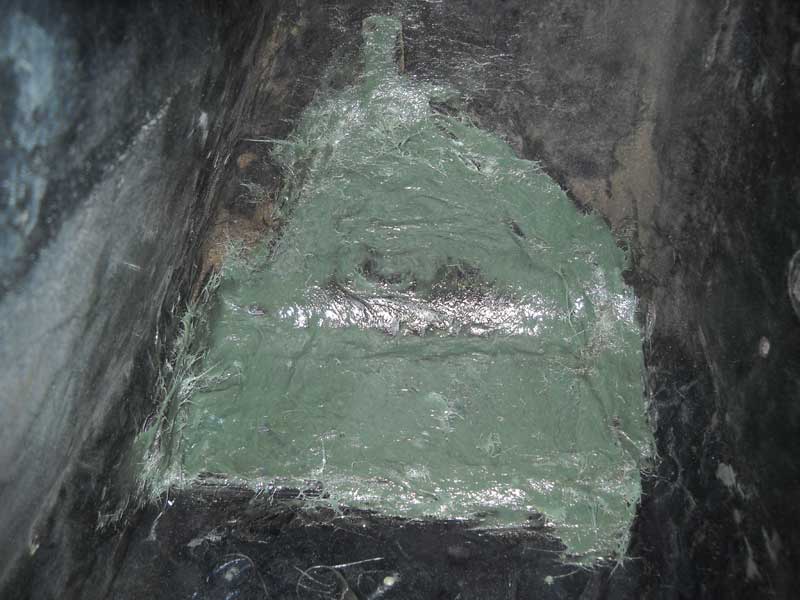
After letting it set for about 20 minutes, I used my palm sander and 150 grit paper to bring it down level.
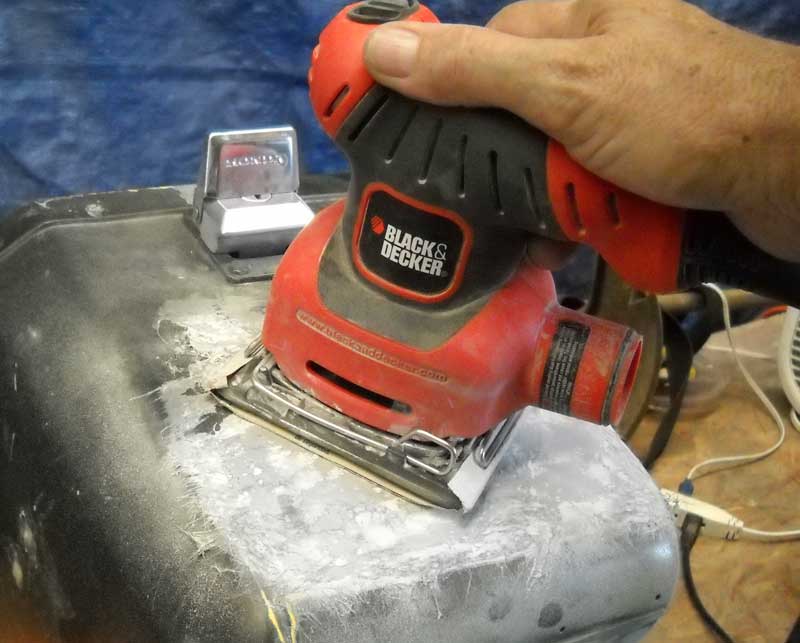
Next, it's off to get some Glazing Putty to try my hand at the next phase.
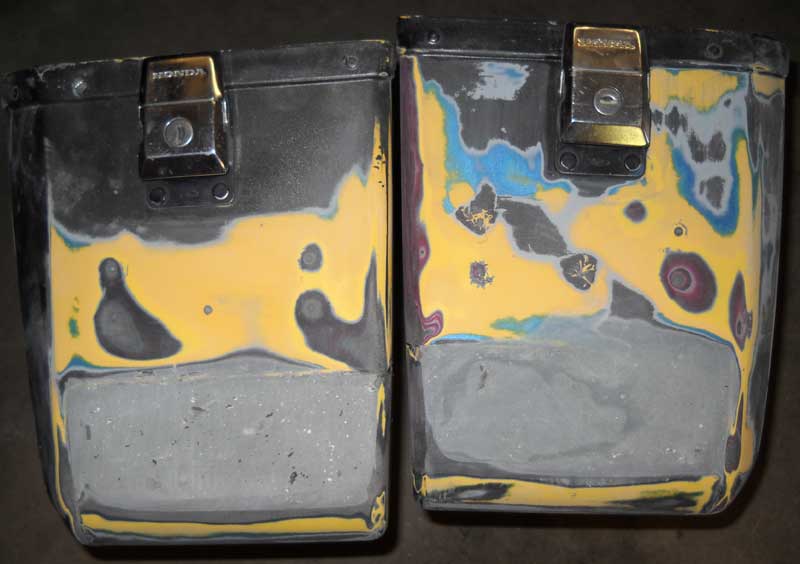
And I am starting to fear the painting phase.
The buddy I'd been counting on to fill the bag's winker gaps was none-too-encouraging when I took them over to his place. He'd done some body work on cars but was really at a loss with this ABS stuff. But I've been reading through CrashDown's thread and was highly motivated by his most excellent instructions. Having never done any body work of any kind I gritted my teeth and took the leap, bought the needed supplies and dove into it.
A few days ago I trimmed down and glued in the winker covers with ABS cement.
Today, I cut "custom" backer plates and taped them inside the boxes.
After stirring the Kitty Hair, out comes a 4" diameter glob onto my palette, a scrap of aluminum sheet.
Then a line of hardener and mix it up real good.
Spread the Kitty Hair into the hole making sure to press it firmly into all of the edges. A tip ... don't work it too much or the glass will work itself out. It starts to harden in about 5 minutes.
After a few minutes I peeled off the backer plate. It didn't really want to stick very well.
Then, another batch of Kitty Hair to kinda fill in the inside of the patch.
After letting it set for about 20 minutes, I used my palm sander and 150 grit paper to bring it down level.
Next, it's off to get some Glazing Putty to try my hand at the next phase.
And I am starting to fear the painting phase.