The new coils showed up today and I got right into stipping off the shelter to get to the old ones. As I understand it you just remove the two mounting bolts from the coil bracket and pull the whole thing out (disconnect the wires first)? How do you all suggest I remove the lower bracket bolt? This thing seems impossible to get to, the wiring harness and all the cables are routed right in front of it!
After that just bolt up the new coils to the bracket, change the connectors on the wires to the crimp ring connectors that were provided and screw into the terminals on the coil, make new spark plug wires. Do I need to keep the resistor or with these new coils it's not necessary? The wires that came with the kit seem to be non resistor wires.
Just caught the (*) at the end of Octanes post on the coil install. So no resistor, but does it matter which wire goes to which coil? I get that the plug wires don't matter (side to side) but does it matter which wire (that used to go into the resistor) goes into each coil?
sickradsean wrote: ↑Fri Oct 22, 2021 1:32 am
Just caught the (*) at the end of Octanes post on the coil install. So no resistor, but does it matter which wire goes to which coil? I get that the plug wires don't matter (side to side) but does it matter which wire (that used to go into the resistor) goes into each coil?
Those two wires, that were originally connected to either end of the ballast resistor, are then connected together to complete the +12vdc supply circuit that feeds the Off/Run/Off handlebar switch.
20190530_120059_resized.jpg
You do not have the required permissions to view the files attached to this post.
Last edited by gltriker on Wed Nov 29, 2023 10:06 pm, edited 1 time in total.
Cliff )
Keep your eyes and ears open and you'll learn something new, everyday.
RE: a thorough fuel tank cleaning
"And your carbs will thank you. They no longer live down stream from a sewage plant." -gregforesi
"Can't see the paint when your looking thru the handlebars..........." -Oldewing "I'd rather Ride than Shine" -RAT Me Too!!
So connect the two wires from the ballast resistor together and then the blue wire to one coil and yellow to the other? Do I still need to ground the unit? When I was taking off the mounting bolt it had a green wire solder lug on it.
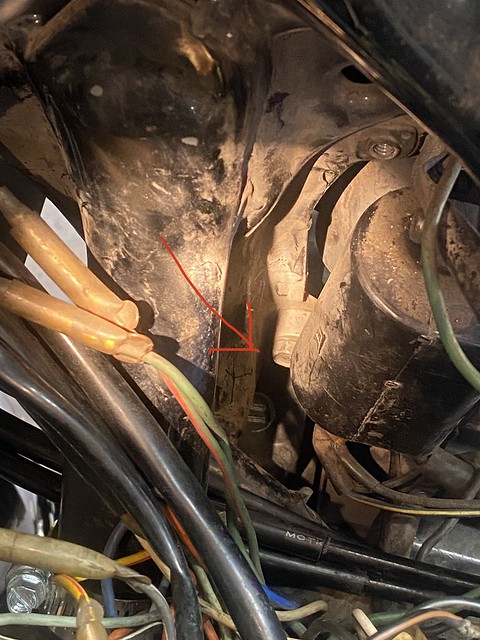
So after MANY attempts to get the lower bolt off i finally stumbled on this old wrench i got from my grampa. It's a 1/4" drive socket with an elbow that I put a 10mm socket on. Got that bolt out 1/4 turn at a time! When I reinstall I plan on using stainless socket head screws to make it easier to get in there.
I then followed the instructions on the Dyna coils and got them wired up. I clipped the old wire leads off the old coils and soldered the ring lugs onto the new coils and installed them on the mounting bracket. I did have to file the bracket a lil bit to let them fit. Apparently the Dyna mounts are like a 1/32 larger than the stock coils.
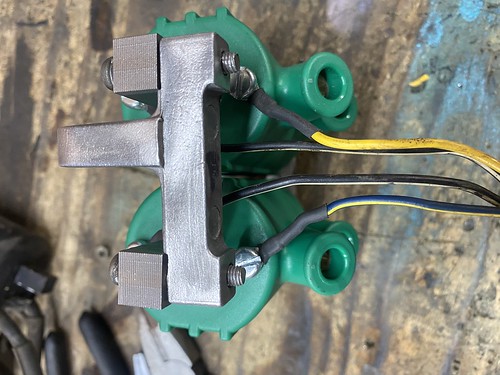
So now it's just mount the assembly back on the frame (with the ground lug on the frame mount) and reconnect the coil wires to the harness. I connected the two black/orange wires together that would have gone to the ballast resistor and then its yellow to yellow, blue to blue, and the two black/white go to the one double plug black/white on the harness.
Got those new Dynas on and wired back up. Cut the ignition wires and spliced them back onto the NGK boots (all with a good helping of electrical grease). While i was all in the wiring harness I repaired a few, let's say "creative", splices the PO had done (just think zip ties and electrical tape). When I went to test if the coils would fire this is what I got: https://flic.kr/p/2mELVfy
That is A LOT of post engine backfire! You catch the flame in the first few?? I'm stumped as to why a machine that was running tip top 4 weeks ago is now at this stage?! It will seem to smooth out if I can start it and keep the RPM above 3000, so that leads me to believe the idle circuit is clogged? Since I've replaced the coils do I HAVE to reset the timing? Many questions, I know.
My next course of action would be to start at the beginning again. Belts, timing, valves, carbs (particularly idle jets, floats, and needles), unless someone can point me in another direction.
Make sure the plug wires are all connected properly. Plugged jets won't cause a backfire like that.
1976 Goldwing Super Sport
1985 Honda Elite
1976 KZ900 Dragbike
1992 ZX7 Dragbike (KZ900 style motor w/NOS)
and a rotation of various purchases
Randakk approved Carb Rebuilder
robin1731 wrote: ↑Thu Oct 28, 2021 10:26 am
Make sure the plug wires are all connected properly. Plugged jets won't cause a backfire like that.
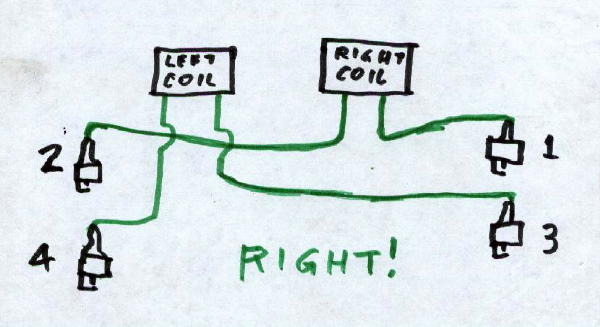
I posted a pic of how I wired the coils above. It was my understanding that it didn’t matter which terminal the plug wires were connected to as long as you don’t cross over sides (one coil is for cylinders 1&3 the other for 2&4). Is that what you mean? Or literally “they are all plugged in”?
1976 Goldwing Super Sport
1985 Honda Elite
1976 KZ900 Dragbike
1992 ZX7 Dragbike (KZ900 style motor w/NOS)
and a rotation of various purchases
Randakk approved Carb Rebuilder
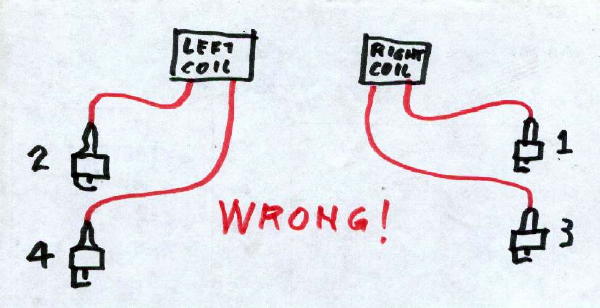
YES!! That was it, I miswired the plug wires. Switched them over to the above drawing, the bike fired right up and is purring along nicely. I think a new set of plugs and some highway miles should get everything back in order. You all are a bunch of Goldwing guardian angels. Thanks for saving my butt again!
A quick 10mi shakedown ride reveals it wasn't the coils after all! After running beautifully for about 9.5 of those miles the engine started acting like it was absolutely starved for fuel (plenty of gas in the tank). So now I know it's not the coils, wires, plugs, fuel filter, fuel line, or fuel pump (that would either fail or be fine, not randomly cut in and out?). What else would lead to an intermittent problem like this? Crap in the tank blocking the gas flow, stuck butterfly not opening, crap in the carbs clogging the jets, clogged petcock? I feel like its a fuel delivery issue. I'll try blasting out the carbs again to see if that changes anything, after that I feel I will just have to pull the rack and open them up.