Bike of the Year Voting in the Clubhouse.
Voting closes 17 December, Only 2 days left, Make your voice heard!
click here: viewtopic.php?t=79374#p833813
Voting closes 17 December, Only 2 days left, Make your voice heard!
click here: viewtopic.php?t=79374#p833813
Mr.H's new engine
Moderators: Brant, Sagebrush, Forum Moderators
-
BikeMaine

- Gold Member

- Posts: 1109
- Joined: Sun Feb 07, 2016 7:57 pm
- Location: Maine, U.S.A.
-
Sidecar Bob

- Honored Life Member

- Posts: 8220
- Joined: Sun Jun 11, 2006 10:14 pm
- Location: Kawartha Lakes, Ontario
Re: Mr.H's new engine
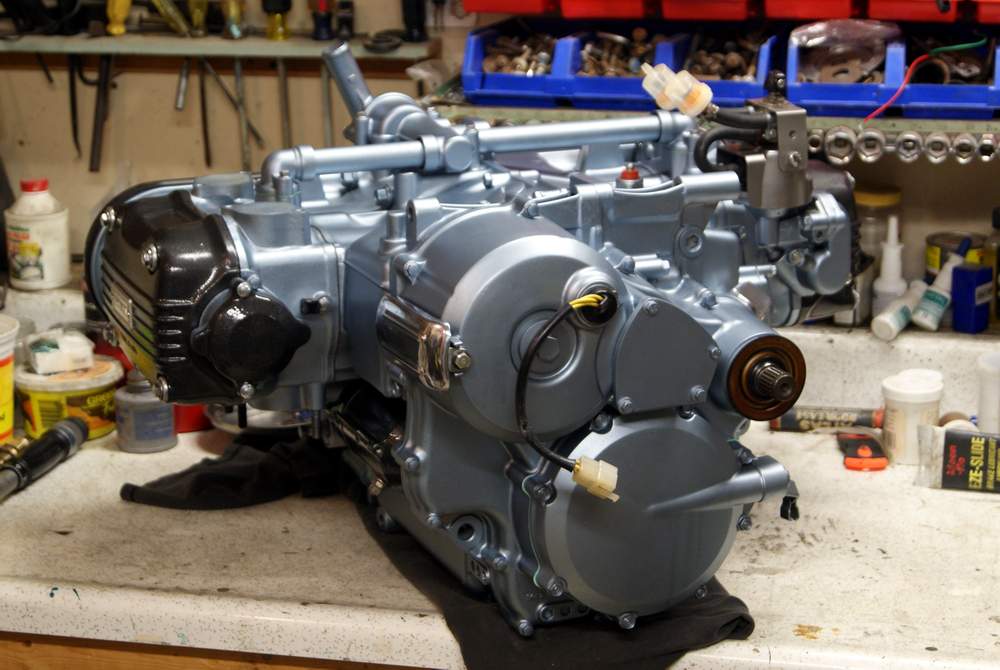
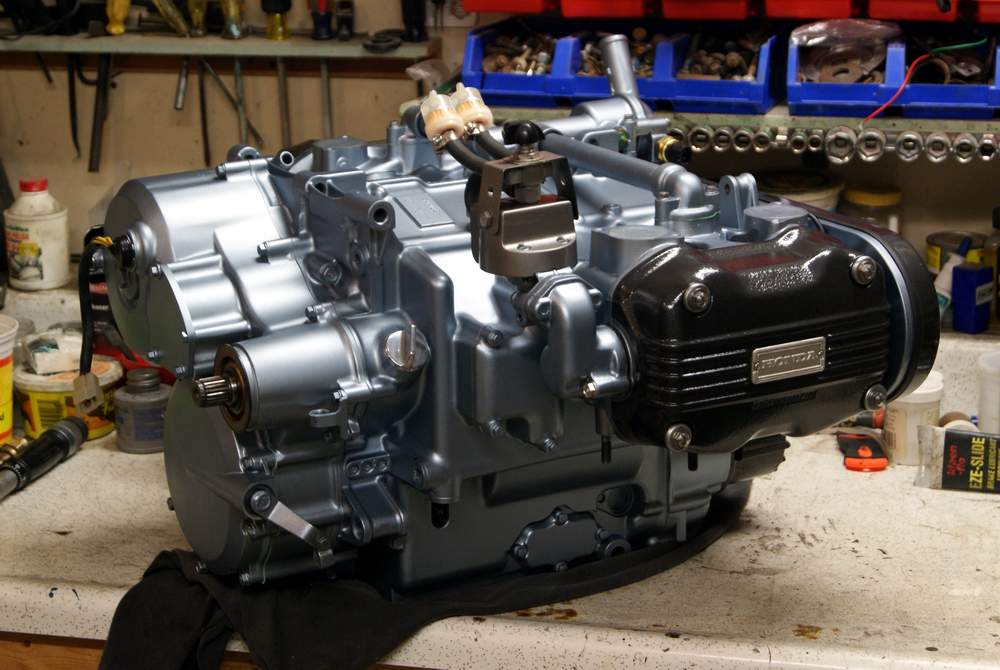
Expecting rain today I had planned to move the engine back to the workbench for final assembly but we only had light rain for a few minutes and as warm as yesterday so I did this instead
That's the first time in 9 years that they have been separated. After I took that a couple of neighbours helped me move the sidecar into the other side of the garage beside the still dead Eccles. They are calling for a high of 12c tomorrow so it will be a good day to work in the shop with the doors closed & the heat on.
BTW: We have a 24x24' attached garage with a load bearing wall down the middle, separating the "car side" (the wife parks her car there in winter but it becomes shop space in warm weather) and the "bike side" which is in turn divided into the bike parking space and the shop. It is heated by 3 ceiling mounted radiant electric heaters, 1 in each area and there are doors that can be closed to keep heat in the shop or in both shop and bike parking space on the rare occasion that I need to work on Eccles in there in winter.
BTW: We have a 24x24' attached garage with a load bearing wall down the middle, separating the "car side" (the wife parks her car there in winter but it becomes shop space in warm weather) and the "bike side" which is in turn divided into the bike parking space and the shop. It is heated by 3 ceiling mounted radiant electric heaters, 1 in each area and there are doors that can be closed to keep heat in the shop or in both shop and bike parking space on the rare occasion that I need to work on Eccles in there in winter.
You do not have the required permissions to view the files attached to this post.
Mr. Honda ('83 GL1100/Dnepr) summer How a motorcycle evolves thread
The Famous Eccles ('84 CX650EI/VeloUral) winter Never Ending Build (CX500forum)
Click: Colour schematics for all GL1000 & GL1100 and GL1200 standard models plus instructions on how to download the full size version
"A guy with two sidecars can't be all bad." - Cookie
Another guy with two sidecars..... Hmmmm... must be something to that....
-
Sidecar Bob
- Honored Life Member
- Posts: 8220
- Joined: Sun Jun 11, 2006 10:14 pm
- Location: Kawartha Lakes, Ontario
Re: Mr.H's new engine
Well, the cool day for working in the shop never happened and I've been busy with other stuff like tilling up a 400 sq.ft. patch of grass and preparing it for planting a veggie garden next weekend.
It looked so skinny by the time I had all the fiddly stuff disconnected &/or removed Is this what they mean by a "naked" 'Wing?
It looked so skinny by the time I had all the fiddly stuff disconnected &/or removed Is this what they mean by a "naked" 'Wing?
You do not have the required permissions to view the files attached to this post.
Mr. Honda ('83 GL1100/Dnepr) summer How a motorcycle evolves thread
The Famous Eccles ('84 CX650EI/VeloUral) winter Never Ending Build (CX500forum)
Click: Colour schematics for all GL1000 & GL1100 and GL1200 standard models plus instructions on how to download the full size version
"A guy with two sidecars can't be all bad." - Cookie
Another guy with two sidecars..... Hmmmm... must be something to that....
The Famous Eccles ('84 CX650EI/VeloUral) winter Never Ending Build (CX500forum)
Click: Colour schematics for all GL1000 & GL1100 and GL1200 standard models plus instructions on how to download the full size version
"A guy with two sidecars can't be all bad." - Cookie
Another guy with two sidecars..... Hmmmm... must be something to that....
-
Sidecar Bob
- Honored Life Member
- Posts: 8220
- Joined: Sun Jun 11, 2006 10:14 pm
- Location: Kawartha Lakes, Ontario
Re: Mr.H's new engine
I spent a bunch of time trying to fix the old engine viewtopic.php?f=1&t=65309 and we planted the garden and expanded it twice for a pumpkin patch and a potato patch. And now I'm back to working on the bike again.
I think all of the parts that had to be removed from the old engine for use on the new one are painted & ready to go
- The fuel pump & the cover for the tach drive (the Danmoto 180 instrument panel is triggered by the ignition) match the engine
- The fuel pump cover is a convenient place to mount the diverter valve for the 2nd fuel tank. It was originally chromed but it was in rough shape when I got it. It was painted to match the old engine but the valve is stainless so I decided to paint the cover and the bracket with stainless steel epoxy paint
- Everything else in the pic is done with the hammered black
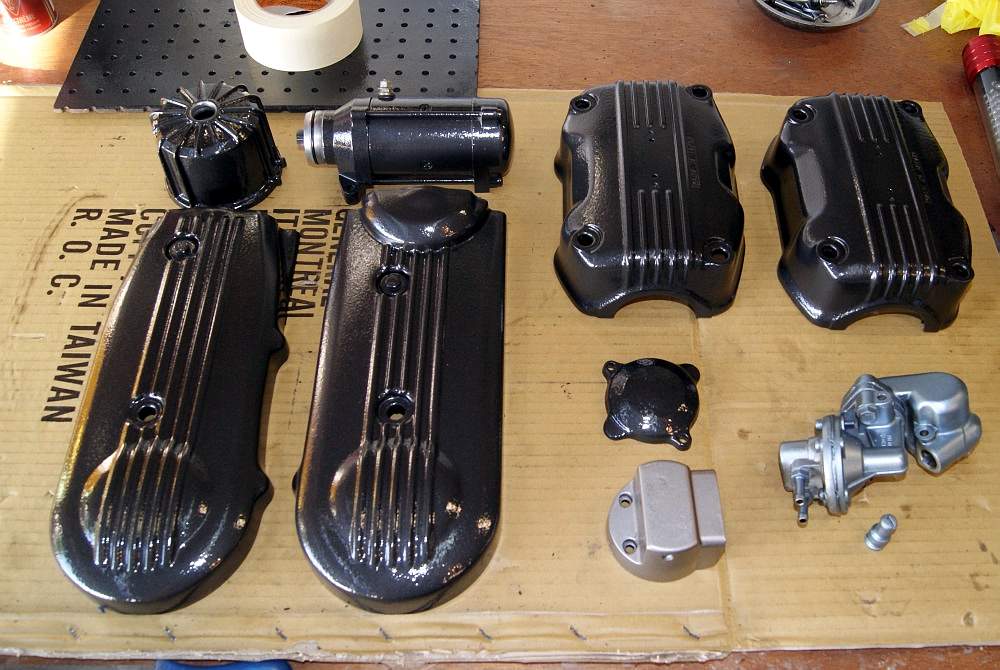
Tomorrow I'll prime all the bare spots with Rust Killer and the next day it isn't raining I'll get out the black.
I washed the outfit before I separated the bike & sidecar, then looked at the dirt that was still on the part of the bike you can't see with the sidecar in the way and washed the bike again. Then I washed it again to get it ready for painting the frame. But every time it dried I saw more dirt so I went over it with mineral spirits and after wiping it down it was starting to look clean. Then I spent several hours clearing out drain holes &c (I'll spray a creeping oil treatment into all of them after painting and add that to the annual service from now on). Once the dirt was off all of the dings, scratches &c that were rusty became apparent so today I went over it with rust remover and then (you guessed it) rolled it back outside to wash it yet again. I think it has been washed more times this month than it usually is in the whole season
I think all of the parts that had to be removed from the old engine for use on the new one are painted & ready to go
- The fuel pump & the cover for the tach drive (the Danmoto 180 instrument panel is triggered by the ignition) match the engine
- The fuel pump cover is a convenient place to mount the diverter valve for the 2nd fuel tank. It was originally chromed but it was in rough shape when I got it. It was painted to match the old engine but the valve is stainless so I decided to paint the cover and the bracket with stainless steel epoxy paint
- Everything else in the pic is done with the hammered black
Tomorrow I'll prime all the bare spots with Rust Killer and the next day it isn't raining I'll get out the black.
I washed the outfit before I separated the bike & sidecar, then looked at the dirt that was still on the part of the bike you can't see with the sidecar in the way and washed the bike again. Then I washed it again to get it ready for painting the frame. But every time it dried I saw more dirt so I went over it with mineral spirits and after wiping it down it was starting to look clean. Then I spent several hours clearing out drain holes &c (I'll spray a creeping oil treatment into all of them after painting and add that to the annual service from now on). Once the dirt was off all of the dings, scratches &c that were rusty became apparent so today I went over it with rust remover and then (you guessed it) rolled it back outside to wash it yet again. I think it has been washed more times this month than it usually is in the whole season
You do not have the required permissions to view the files attached to this post.
Mr. Honda ('83 GL1100/Dnepr) summer How a motorcycle evolves thread
The Famous Eccles ('84 CX650EI/VeloUral) winter Never Ending Build (CX500forum)
Click: Colour schematics for all GL1000 & GL1100 and GL1200 standard models plus instructions on how to download the full size version
"A guy with two sidecars can't be all bad." - Cookie
Another guy with two sidecars..... Hmmmm... must be something to that....
The Famous Eccles ('84 CX650EI/VeloUral) winter Never Ending Build (CX500forum)
Click: Colour schematics for all GL1000 & GL1100 and GL1200 standard models plus instructions on how to download the full size version
"A guy with two sidecars can't be all bad." - Cookie
Another guy with two sidecars..... Hmmmm... must be something to that....
-
Sidecar Bob
- Honored Life Member
- Posts: 8220
- Joined: Sun Jun 11, 2006 10:14 pm
- Location: Kawartha Lakes, Ontario
Re: Mr.H's new engine
After it dried for a couple of days I went over the bare areas with Rust Killer (brush on zinc bearing primer) and after that cured for a couple of days I sanded & scuffed and got at it with the Gloss Black RustCoat.
Note that I prefer to brush paint frames; If you use a good brush and take our time it comes out pretty smooth and because it goes on thicker it is more resistant to chips & scratches. There are a few ripples (mostly noticeable on the tank) but most of those will be hidden by the seat. I don't remember this frame ever being so shiny "Silvery Trim colour": I came up with this 3 years ago when I was putting the carbs back together after replacing the carb to plenum seals I wanted to do something about the carb stays. Originally chromed, they had seen better days when I painted them to match the engine & carbs some years before but they were looking tired again and I wanted them to stand out a bit. After a few experiments I figured out that if I sprayed on a light coat of Stainless Steel Epoxy Appliance Enamel, let it flash and added a 2nd coat, then hit it with clear gloss lacquer before the stainless flashed the lacquer would pick up some of the stainless and result in a deep & glossy version of the stainless with a slightly metallic effect that you don't notice on the plain stainless and without taking the patina the stainless takes on if applied by itself. Since it has held up on the carb stays I decided to do the engine hangers that way, then looked at the fuel pump cover that I had already painted stainless and decided it needed the same treatment, as well as the brackets that attach the diverter valve to the top of it.
Its hard to get a good picture of a colour like that but here's a closer view of the engine hangers that you might be able to get an idea from
You do not have the required permissions to view the files attached to this post.
Mr. Honda ('83 GL1100/Dnepr) summer How a motorcycle evolves thread
The Famous Eccles ('84 CX650EI/VeloUral) winter Never Ending Build (CX500forum)
Click: Colour schematics for all GL1000 & GL1100 and GL1200 standard models plus instructions on how to download the full size version
"A guy with two sidecars can't be all bad." - Cookie
Another guy with two sidecars..... Hmmmm... must be something to that....
The Famous Eccles ('84 CX650EI/VeloUral) winter Never Ending Build (CX500forum)
Click: Colour schematics for all GL1000 & GL1100 and GL1200 standard models plus instructions on how to download the full size version
"A guy with two sidecars can't be all bad." - Cookie
Another guy with two sidecars..... Hmmmm... must be something to that....
-
Sidecar Bob
- Honored Life Member
- Posts: 8220
- Joined: Sun Jun 11, 2006 10:14 pm
- Location: Kawartha Lakes, Ontario
Re: Mr.H's new engine
Teaser:
Its late. I'll post more in the morning...
Its late. I'll post more in the morning...
Mr. Honda ('83 GL1100/Dnepr) summer How a motorcycle evolves thread
The Famous Eccles ('84 CX650EI/VeloUral) winter Never Ending Build (CX500forum)
Click: Colour schematics for all GL1000 & GL1100 and GL1200 standard models plus instructions on how to download the full size version
"A guy with two sidecars can't be all bad." - Cookie
Another guy with two sidecars..... Hmmmm... must be something to that....
The Famous Eccles ('84 CX650EI/VeloUral) winter Never Ending Build (CX500forum)
Click: Colour schematics for all GL1000 & GL1100 and GL1200 standard models plus instructions on how to download the full size version
"A guy with two sidecars can't be all bad." - Cookie
Another guy with two sidecars..... Hmmmm... must be something to that....
-
Sidecar Bob
- Honored Life Member
- Posts: 8220
- Joined: Sun Jun 11, 2006 10:14 pm
- Location: Kawartha Lakes, Ontario
Re: Mr.H's new engine
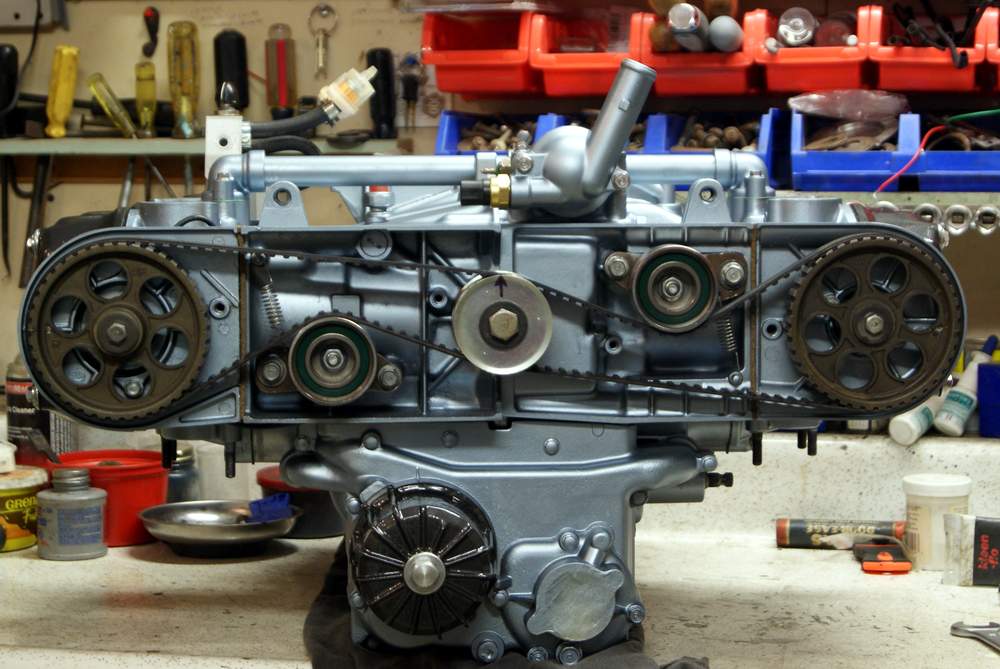
Between the garden and family stuff I didn't get much done for a few weeks but as you can see from the above pic I've been back at it this week.
Wednesday: I wanted to install the clutch and the crankshaft pulleys at the same time so I could hold each one with a long wrench jammed against the bench while I torqued the other. My clutch nut wrench (modified 15/16" socket) was where it should be but I spent about an hour looking for the 19mm socket before finally giving up and using the 3/4" one. Then I put the lock washer, belleville washer and nut on the shaft, threw in a few of the clutch springs, the lifter and some screws and torqued the pulley bolt and clutch nut and tried to bend a tang on the lock washer but it wouldn't reach the notch in the nut. The sharper of you will have realized what I did wrong by now (the belleville washer is supposed to go on before the lock washer). So I dug out the impact gun to undo the clutch nut and guess which socket was on it?
Installing the heads was easy & straightforward. Then I cut new gaskets for between the edges of the belt cover backing plates and the block from 1/8" cork sheet, glued them on, installed the plates and bolted on the pulleys. Next I installed the "plumbing" on top of the engine. When I took the water joint gaskets out of the bag I noticed the gaskets that go between the plates and the heads sitting in the bag Its a good thing I didn't put the belts on before the plumbing....
I was going to put the timing belt adjusters on but I realized I hadn't cleaned the hardware so I gave it a quick clean, dunked it in some Evapo-Rust and called it a night.
BTW: Wednesday's dinner included a salad with fresh ingredients from our own garden.
Thursday: I started by removing the parts from the Evapo-rust, washing them, giving them a quick dip for future protection and laying them out to dry. While I was doing that I remembered that all of the hardware needed to install the engine was sitting dirty & rusty in a margarine tub so I spent over an hour going through all of it and the stuff from the parts bike, picking the best ones, cleaning them up and dropping them into a tub of mineral spirits, then wiping them all off and laying them out to dry while I had lunch. When I returned I put them all in the Evapo-Rust
Next I installed the belts (its really pretty easy when the engine is on the bench) and adjusted the valve clearances. I wanted to take pics so I glued the new gaskets to the rocker covers and bolted them on, then did the same for the timing belt covers (Note that the gaskets for the belt covers are a bit too long so I had to compress them lengthwise and install the covers immediately to clamp the gaskets in place while the glue dried.
BTW: I had intended to use contact cement to glue the gaskets to the covers but I ran out and forgot to get more so I used some Shoe Goo. I guess I'll know how well that works when I have the belt cover gaskets off again.
And here are the pics:
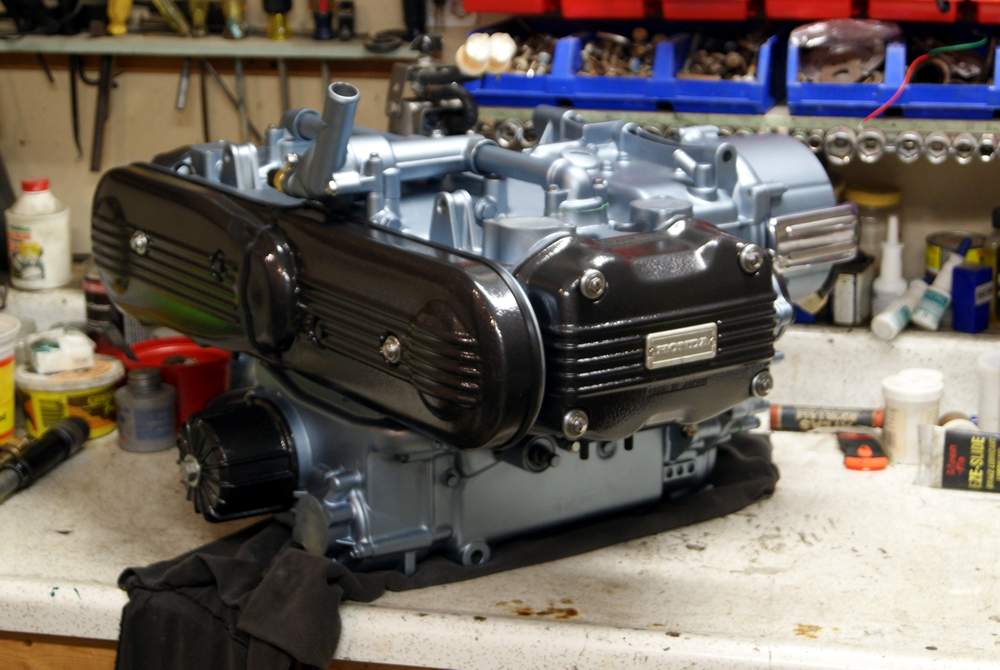
(Before I winch it down from the bench I'll be removing a few parts until after it is in the frame.)
I gave the stuff in the Evapo-Rust a good stir before I quit last night so my first job in the shop today will be doing the rinse & dip routine with all of that. I also have to see if I can figure out how to get the driveshaft to re-engage with the final drive without having to remove the rear wheel and FD before I can start installing the engine....
Edit Mar 2020: "modified 15/16" socket, not "5/16"
Wednesday: I wanted to install the clutch and the crankshaft pulleys at the same time so I could hold each one with a long wrench jammed against the bench while I torqued the other. My clutch nut wrench (modified 15/16" socket) was where it should be but I spent about an hour looking for the 19mm socket before finally giving up and using the 3/4" one. Then I put the lock washer, belleville washer and nut on the shaft, threw in a few of the clutch springs, the lifter and some screws and torqued the pulley bolt and clutch nut and tried to bend a tang on the lock washer but it wouldn't reach the notch in the nut. The sharper of you will have realized what I did wrong by now (the belleville washer is supposed to go on before the lock washer). So I dug out the impact gun to undo the clutch nut and guess which socket was on it?
Installing the heads was easy & straightforward. Then I cut new gaskets for between the edges of the belt cover backing plates and the block from 1/8" cork sheet, glued them on, installed the plates and bolted on the pulleys. Next I installed the "plumbing" on top of the engine. When I took the water joint gaskets out of the bag I noticed the gaskets that go between the plates and the heads sitting in the bag
I was going to put the timing belt adjusters on but I realized I hadn't cleaned the hardware so I gave it a quick clean, dunked it in some Evapo-Rust and called it a night.
BTW: Wednesday's dinner included a salad with fresh ingredients from our own garden.
Thursday: I started by removing the parts from the Evapo-rust, washing them, giving them a quick dip for future protection and laying them out to dry. While I was doing that I remembered that all of the hardware needed to install the engine was sitting dirty & rusty in a margarine tub so I spent over an hour going through all of it and the stuff from the parts bike, picking the best ones, cleaning them up and dropping them into a tub of mineral spirits, then wiping them all off and laying them out to dry while I had lunch. When I returned I put them all in the Evapo-Rust
Next I installed the belts (its really pretty easy when the engine is on the bench) and adjusted the valve clearances. I wanted to take pics so I glued the new gaskets to the rocker covers and bolted them on, then did the same for the timing belt covers (Note that the gaskets for the belt covers are a bit too long so I had to compress them lengthwise and install the covers immediately to clamp the gaskets in place while the glue dried.
BTW: I had intended to use contact cement to glue the gaskets to the covers but I ran out and forgot to get more so I used some Shoe Goo. I guess I'll know how well that works when I have the belt cover gaskets off again.
And here are the pics:
(Before I winch it down from the bench I'll be removing a few parts until after it is in the frame.)
I gave the stuff in the Evapo-Rust a good stir before I quit last night so my first job in the shop today will be doing the rinse & dip routine with all of that. I also have to see if I can figure out how to get the driveshaft to re-engage with the final drive without having to remove the rear wheel and FD before I can start installing the engine....
Edit Mar 2020: "modified 15/16" socket, not "5/16"
Last edited by Sidecar Bob on Wed Mar 18, 2020 3:56 pm, edited 1 time in total.
Mr. Honda ('83 GL1100/Dnepr) summer How a motorcycle evolves thread
The Famous Eccles ('84 CX650EI/VeloUral) winter Never Ending Build (CX500forum)
Click: Colour schematics for all GL1000 & GL1100 and GL1200 standard models plus instructions on how to download the full size version
"A guy with two sidecars can't be all bad." - Cookie
Another guy with two sidecars..... Hmmmm... must be something to that....
The Famous Eccles ('84 CX650EI/VeloUral) winter Never Ending Build (CX500forum)
Click: Colour schematics for all GL1000 & GL1100 and GL1200 standard models plus instructions on how to download the full size version
"A guy with two sidecars can't be all bad." - Cookie
Another guy with two sidecars..... Hmmmm... must be something to that....
-
Rednaxs60
- Gold Member
- Posts: 1131
- Joined: Mon Nov 30, 2015 11:14 pm
- Location: Victoria, BC, Canada
Re: Mr.H's new engine
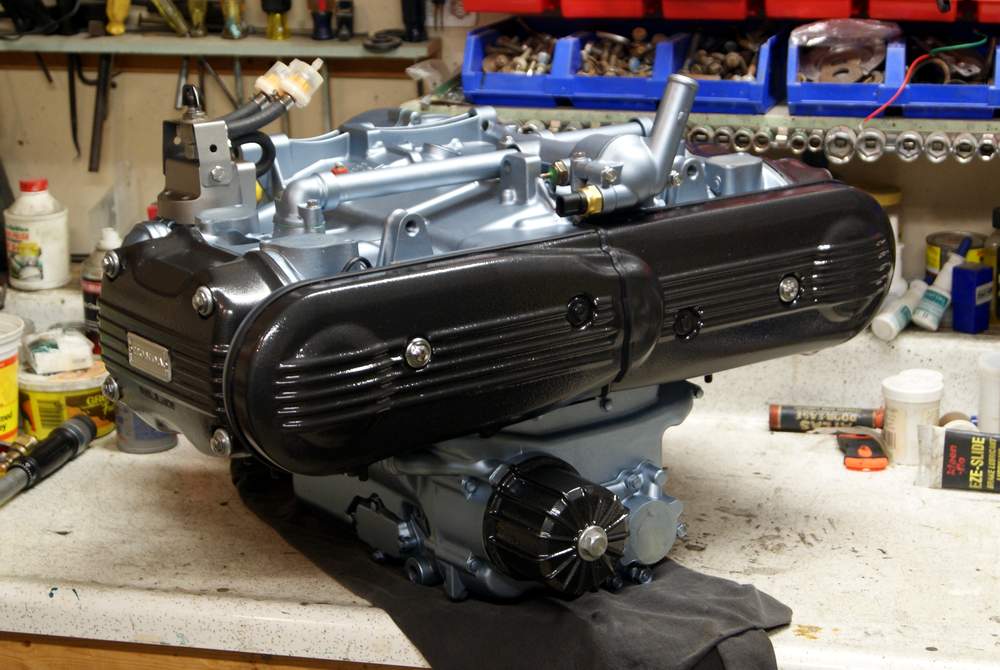
Great job! Black seems to be an in colour this year.
"When writing the Story of your life, don't let anyone else hold the pen."
Ernest
1985 GL1200 Limited Edition
2014 Can-Am Spyder RT LE
2021 Royal Enfield Himalayan (sold)
1995 GL1500 SE CDN Edition (sold)
2012 Suzuki DL1000 VStrom (sold)
Ontario 1985 GL1200 Limited Edition (sold)
2008 GL1800 (sold)
Ernest
1985 GL1200 Limited Edition
2014 Can-Am Spyder RT LE
2021 Royal Enfield Himalayan (sold)
1995 GL1500 SE CDN Edition (sold)
2012 Suzuki DL1000 VStrom (sold)
Ontario 1985 GL1200 Limited Edition (sold)
2008 GL1800 (sold)
-
Sidecar Bob
- Honored Life Member
- Posts: 8220
- Joined: Sun Jun 11, 2006 10:14 pm
- Location: Kawartha Lakes, Ontario
Re: Mr.H's new engine
Black is always an "in colour". Those are all the covers from the old engine, which I originally painted with the hammered black in 2011 (pic in post #1). I like the look of the 1000 rocker covers better than the 1100 ones so I just cleaned them up and re-sprayed them with the same paint. I do like the way they look with that engine paint, though.
Mr. Honda ('83 GL1100/Dnepr) summer How a motorcycle evolves thread
The Famous Eccles ('84 CX650EI/VeloUral) winter Never Ending Build (CX500forum)
Click: Colour schematics for all GL1000 & GL1100 and GL1200 standard models plus instructions on how to download the full size version
"A guy with two sidecars can't be all bad." - Cookie
Another guy with two sidecars..... Hmmmm... must be something to that....
The Famous Eccles ('84 CX650EI/VeloUral) winter Never Ending Build (CX500forum)
Click: Colour schematics for all GL1000 & GL1100 and GL1200 standard models plus instructions on how to download the full size version
"A guy with two sidecars can't be all bad." - Cookie
Another guy with two sidecars..... Hmmmm... must be something to that....
-
ritalz
- Honored Life Member
- Posts: 4331
- Joined: Sat Jun 25, 2005 10:22 am
- Location: St Louis, MO
Re: Mr.H's new engine
Nice work. Hope the engine runs as good as it looks.
Al
2003 Goldwing Daily Rider
1975 Goldwing 'Max'
1984 Goldwing New Bagger Project
1986 Goldwing Aspy 2nd daily rider
1976 Goldwing 'Grocery Getter' Sold
1985 Goldwing Interstate 'NCC-1985' sold
1981 Silverwing Sold
1982 Goldeing Project Sold
1981 Goldwing Parted Out
1983 Goldwing Project Sold
1973 CB500F Long Gone
1966 CL77 First Street Bike
http://www.ngwclub.com/gallery3/index.p ... ans/ritalz
-
Sidecar Bob
- Honored Life Member
- Posts: 8220
- Joined: Sun Jun 11, 2006 10:14 pm
- Location: Kawartha Lakes, Ontario
Re: Mr.H's new engine
Me too.
Mr. Honda ('83 GL1100/Dnepr) summer How a motorcycle evolves thread
The Famous Eccles ('84 CX650EI/VeloUral) winter Never Ending Build (CX500forum)
Click: Colour schematics for all GL1000 & GL1100 and GL1200 standard models plus instructions on how to download the full size version
"A guy with two sidecars can't be all bad." - Cookie
Another guy with two sidecars..... Hmmmm... must be something to that....
The Famous Eccles ('84 CX650EI/VeloUral) winter Never Ending Build (CX500forum)
Click: Colour schematics for all GL1000 & GL1100 and GL1200 standard models plus instructions on how to download the full size version
"A guy with two sidecars can't be all bad." - Cookie
Another guy with two sidecars..... Hmmmm... must be something to that....
-
Sugs

- Gold Member
- Posts: 1071
- Joined: Sun Aug 09, 2015 6:12 pm
- Location: Springfield, MO
Re: Mr.H's new engine
Love that blueish engine color too. Inspiried by the CX500?
_______________________
'79 Honda GL1000 Goldwing
'79 Honda GL1000 Goldwing
-
Sidecar Bob
- Honored Life Member
- Posts: 8220
- Joined: Sun Jun 11, 2006 10:14 pm
- Location: Kawartha Lakes, Ontario
Re: Mr.H's new engine
No, inspired by what Canadian Tire had in stock viewtopic.php?f=30&t=63232&start=90#p723702
Mr. Honda ('83 GL1100/Dnepr) summer How a motorcycle evolves thread
The Famous Eccles ('84 CX650EI/VeloUral) winter Never Ending Build (CX500forum)
Click: Colour schematics for all GL1000 & GL1100 and GL1200 standard models plus instructions on how to download the full size version
"A guy with two sidecars can't be all bad." - Cookie
Another guy with two sidecars..... Hmmmm... must be something to that....
The Famous Eccles ('84 CX650EI/VeloUral) winter Never Ending Build (CX500forum)
Click: Colour schematics for all GL1000 & GL1100 and GL1200 standard models plus instructions on how to download the full size version
"A guy with two sidecars can't be all bad." - Cookie
Another guy with two sidecars..... Hmmmm... must be something to that....
-
Oldewing

- Secretary

- Posts: 8281
- Joined: Wed Jun 08, 2005 8:19 pm
- Location: Gahanna Ohio
Re: Mr.H's new engine
No dirty fuel for you I see.
Looks great
Looks great
82 GL1100 Interstate-Oldewing October 23 BOTM
06 GL1800 Road bike, as in Rode alot...
Sometimes I wrestle with my inner demons.........
Other times we just hug.......
Team 898
Team LTD 993
Team 76 R2B3
And always remember: beer has some food value--but food has NO beer value...
06 GL1800 Road bike, as in Rode alot...
Sometimes I wrestle with my inner demons.........
Other times we just hug.......
Team 898
Team LTD 993
Team 76 R2B3
And always remember: beer has some food value--but food has NO beer value...
-
Sidecar Bob
- Honored Life Member
- Posts: 8220
- Joined: Sun Jun 11, 2006 10:14 pm
- Location: Kawartha Lakes, Ontario
Re: Mr.H's new engine
One of the filters connects to the bike's tank and the other to the one on the sidecar. The device in the bracket on top of the fuel pump cover is a diverter valve that allows me to select which tank the pump draws from (since the one on the sidecar doesn't have a sender I usually use it first).
Mr. Honda ('83 GL1100/Dnepr) summer How a motorcycle evolves thread
The Famous Eccles ('84 CX650EI/VeloUral) winter Never Ending Build (CX500forum)
Click: Colour schematics for all GL1000 & GL1100 and GL1200 standard models plus instructions on how to download the full size version
"A guy with two sidecars can't be all bad." - Cookie
Another guy with two sidecars..... Hmmmm... must be something to that....
The Famous Eccles ('84 CX650EI/VeloUral) winter Never Ending Build (CX500forum)
Click: Colour schematics for all GL1000 & GL1100 and GL1200 standard models plus instructions on how to download the full size version
"A guy with two sidecars can't be all bad." - Cookie
Another guy with two sidecars..... Hmmmm... must be something to that....