Yes, actually I was wondering about that...I was puzzling over where the downforce/resistance would be coming from. I'll get them out, I'm sure. I'm not too sure HOW yet, but either I will find a way or I will make one.
"Air Hammer" comes to mind...(Kidding! Kind of...).
In the meantime I am truly amazed that there are scant parts or instructions for the 1979 KZ400H, which KZ400.com states is the same bike as a KZ400B model; so I'm kind of working off that.
Problem Child
Moderators: Whiskerfish, ascot, Forum Moderators
-
Dr. Frankenstein

- Silver Member

- Posts: 739
- Joined: Sun Nov 10, 2019 7:22 am
- Location: Charlottesville, VA
-
flyin900
- Platinum Member

- Posts: 1512
- Joined: Sun Jan 10, 2010 3:50 pm
- Location: Canada
Re: Problem Child
I can appreciate that as this CL77 has been a real challenge in a variety of ways. Who new there was a early JIS standard initially, then later a JIS-ISO standard with different thread pitches.
I ordered a bunch of replacement JIS screws and the originals on the bike are the old JIS standards the screws received are now the new JIS-ISO with a different thread pitch.
You wouldn't happen to have some carbs parts for this bike, as I need a set of Keihin slide needles that are specific to these carbs. They have unfortunately been converted to Chinese brass, which I have remedied; yet no luck on the slide needles.
Honda Part # 16151-278-004 with stamp #K24304 on the upper part of the needle. Used exclusively on this model.
Current Bikes:
DISPLAY MODELS:
1966 CL77 - Honda 305cc - Dual purpose - "Gentleman's Scrambler" was a period moniker.
1967 CL175K0 - Low production number with #802 engine serial- winter 2019/2020 full restoration.
1972 CB350F - Baby Four with low mileage - Cosmetic refresh to the next level 2021/2022.
RIDERS AND FUN TOYS:
1978 CB550K - Very original bike with only 7499 Km. from new - light cleanup and refresh done.
1983 CB1100F - Canadian model - DOHC Supersport in pristine low kilometre condition from new.
1984 CX650E - Restored summer 2017 - a rare Eurosport model - excellent one owner bike.
-
Dr. Frankenstein
- Silver Member
- Posts: 739
- Joined: Sun Nov 10, 2019 7:22 am
- Location: Charlottesville, VA
Re: Problem Child
Let me guess - 5.5 pitch, yes...? (Or something like that?)
Let me look; I just got rid of my CA95, but I've had a couple CA77's and one CA78, but I still have my CA77 in the garage; I *may have some parts laying around, but the needles are probably a long shot - but I'll look.
Is that part # correct? There's FIVE sellers showing a #16151-287-004 on Ebay right now (note the '287' rather than the "278":
https://www.ebay.com/itm/114582215110?e ... BMsszaxutf
...and this guy says he has THREE:
https://www.ebay.com/itm/233864786436?e ... Sw669gByJy
-
gltriker
- Honored Life Member

- Posts: 5323
- Joined: Fri Sep 24, 2010 9:11 pm
- Location: central NY State
Re: Problem Child
Dr. John,
I believe I understand, Now, how you were hoping to "jack" the cylinder block up out of the crankcase.
You stated the pistons are frozen near bottom dead center. Something also about the transmission and clutch are frozen solid?
Several fellows have recommended different strategies to free stuck pistons based upon their experiences.
Did you determine whether the crankshaft will actually rotate far enough to give enough room under the cylinder block flange to execute your proposed "jacking " experiment utilizing the four 200 mm length precious metal threaded rod , and their complementing thread hex nuts positioned underneath the 4 outermost corners of the cylinder block flange?
I found a breakdown of the engine crankcase assembly.
https://www.partzilla.com/catalog/kawas ... /crankcase
and crankshaft and connecting rods.
https://www.partzilla.com/catalog/kawas ... t-balancer
I think if the crankshaft won't rotate, the cylinder block and stuck pistons won't release and you are just curious what the rest of the internal rotating and reciprocating parts look like, simply disassemble the horizontally mated crankcase halves from the bottom.
Release both connecting rods' bottom caps, then the complete cylinder block with stuck pistons and upper end of their connecting rods are more readily entirely removed off the crankcase without "jacking' it upwards with the unobtainium threaded rod and hex nuts .
In addition, After releasing both lower connecting rod caps
If any combination of, or ideally all 8 oem crankcase studs (#10 , STUD,10X153 ) are agreeable to being removed that would further ease the disassembly experiment, too.
Done
(wouldn't be proper to say you know what)
Last edited by gltriker on Sun Mar 06, 2022 11:42 am, edited 7 times in total.
Cliff  )
)
Keep your eyes and ears open and you'll learn something new, everyday.
New users please visit our "Shop Talk" for common tips and help: <---jdvorchak
http://www.ngwclub.com/forum/page/ST
^^^^^^^click up here^^^^^
RE: a thorough fuel tank cleaning
"And your carbs will thank you. They no longer live down stream from a sewage plant." -gregforesi
"Can't see the paint when your looking thru the handlebars..........." -Oldewing
"I'd rather Ride than Shine" -RAT Me Too!!
Cliff
'75 GL1000 home built trike; http://www.ngwclub.com/forum/viewtopic.php?f=30&t=39996
October,2017 BOTM https://nakedgoldwingsclub.com/forum/page/Welcome
previous rides:
1953 H-D Servi-car, naked, 1969-1978 (serial#53G1559 committed to memory!)
1980 CB900 Custom (triked) 1997-2003 .... R.I.P.
Keep your eyes and ears open and you'll learn something new, everyday.
New users please visit our "Shop Talk" for common tips and help: <---jdvorchak
http://www.ngwclub.com/forum/page/ST
^^^^^^^click up here^^^^^
RE: a thorough fuel tank cleaning
"And your carbs will thank you. They no longer live down stream from a sewage plant." -gregforesi
"Can't see the paint when your looking thru the handlebars..........." -Oldewing
"I'd rather Ride than Shine" -RAT
Cliff
'75 GL1000 home built trike; http://www.ngwclub.com/forum/viewtopic.php?f=30&t=39996
October,2017 BOTM
previous rides:
1953 H-D Servi-car, naked, 1969-1978 (serial#53G1559 committed to memory!)
1980 CB900 Custom (triked) 1997-2003 .... R.I.P.
-
Dr. Frankenstein
- Silver Member
- Posts: 739
- Joined: Sun Nov 10, 2019 7:22 am
- Location: Charlottesville, VA
Re: Problem Child
Hi Cliff; as it sits now, the engine is still in the frame, and as I mentioned there is little to almost no room to get anything under there to block it up, so I figured I might be able to somehow lift the head off the pistons by pushing down on them and lifting the head up. If they're bottomed out, I wouldn't think that taking the studs out would do me any good since they're not really holding anything down - although at this point I'll try anything. Dropping the engine is becoming more and more of a reality, but at this point I really want to get the sprocket cover off first. It's like trying to husk a coconut with a screwdriver...Barb's dance card has been pretty full these days, so I haven't been able to spend as much time as I'd like in the garage - but I'll get it, somehow.
-
flyin900
- Platinum Member
- Posts: 1512
- Joined: Sun Jan 10, 2010 3:50 pm
- Location: Canada
Re: Problem Child
The thread pitch changed from .8TP to .9TP on a couple of 5mm JIS screws and hex bolts. So it won't thread without cutting new threads. Which I did on an old part and was successful, since the TP is close. It is fortunately on non critical stress parts where I have found the changes so far.Dr. Frankenstein wrote: ↑Sat Mar 05, 2022 7:36 pm Let me guess - 5.5 pitch, yes...? (Or something like that?)
Let me look; I just got rid of my CA95, but I've had a couple CA77's and one CA78, but I still have my CA77 in the garage; I *may have some parts laying around, but the needles are probably a long shot - but I'll look.
Is that part # correct? There's FIVE sellers showing a #16151-287-004 on Ebay right now (note the '287' rather than the 278.
Yes the part number is 100% on the carb needles and the K24304 is stamped on the top area of the needle. It is specific to that CL77 carb set, so if you have CB/CA etc; unless someone used a CL needle which is somewhat possible in the past. I likely will see a unicorn and find a few needles in a haystack first.
When you have a chance to check you parts stash and look for the K 24304 stamping on the needle it would be much appreciated.
Current Bikes:
DISPLAY MODELS:
1966 CL77 - Honda 305cc - Dual purpose - "Gentleman's Scrambler" was a period moniker.
1967 CL175K0 - Low production number with #802 engine serial- winter 2019/2020 full restoration.
1972 CB350F - Baby Four with low mileage - Cosmetic refresh to the next level 2021/2022.
RIDERS AND FUN TOYS:
1978 CB550K - Very original bike with only 7499 Km. from new - light cleanup and refresh done.
1983 CB1100F - Canadian model - DOHC Supersport in pristine low kilometre condition from new.
1984 CX650E - Restored summer 2017 - a rare Eurosport model - excellent one owner bike.
DISPLAY MODELS:
1966 CL77 - Honda 305cc - Dual purpose - "Gentleman's Scrambler" was a period moniker.
1967 CL175K0 - Low production number with #802 engine serial- winter 2019/2020 full restoration.
1972 CB350F - Baby Four with low mileage - Cosmetic refresh to the next level 2021/2022.
RIDERS AND FUN TOYS:
1978 CB550K - Very original bike with only 7499 Km. from new - light cleanup and refresh done.
1983 CB1100F - Canadian model - DOHC Supersport in pristine low kilometre condition from new.
1984 CX650E - Restored summer 2017 - a rare Eurosport model - excellent one owner bike.
-
Dr. Frankenstein
- Silver Member
- Posts: 739
- Joined: Sun Nov 10, 2019 7:22 am
- Location: Charlottesville, VA
Re: Problem Child
I don't know if you've seen these guys, but I've bought from them several times with great results - I've put carb kits from these guys in multiple bikes I have, including my '75 GL1000, with no problems - they have two listed for the CL77, and lists the needle as a D30(?)...it may cross-reference to the "K24304", but you would know more about that than I do. What year is your Scrambler? I'm always searching for parts, I'll keep an eye out...
https://daminedingmoto.com/2-x-carburet ... ler-cl-77/
https://daminedingmoto.com/carburetor-c ... ler-cl-77/
https://daminedingmoto.com/2-x-carburet ... ler-cl-77/
https://daminedingmoto.com/carburetor-c ... ler-cl-77/
-
flyin900
- Platinum Member
- Posts: 1512
- Joined: Sun Jan 10, 2010 3:50 pm
- Location: Canada
Re: Problem Child
The bike is a 1966 CL77 Scrambler and that kit looks interesting. The D30 is the aftermarket correct slide needle piece from my research. These carbs had Chinese #$%^%$ in there with a D2 slide needle. It wasn't running when I bought it, so no knowledge of what affect the Chinese jets and slide needles had on the bike.
I will keep looking, as I am likely a few months away from getting into the full assembly. It seems I am always sourcing parts for it these days.
I will keep looking, as I am likely a few months away from getting into the full assembly. It seems I am always sourcing parts for it these days.
Current Bikes:
DISPLAY MODELS:
1966 CL77 - Honda 305cc - Dual purpose - "Gentleman's Scrambler" was a period moniker.
1967 CL175K0 - Low production number with #802 engine serial- winter 2019/2020 full restoration.
1972 CB350F - Baby Four with low mileage - Cosmetic refresh to the next level 2021/2022.
RIDERS AND FUN TOYS:
1978 CB550K - Very original bike with only 7499 Km. from new - light cleanup and refresh done.
1983 CB1100F - Canadian model - DOHC Supersport in pristine low kilometre condition from new.
1984 CX650E - Restored summer 2017 - a rare Eurosport model - excellent one owner bike.
DISPLAY MODELS:
1966 CL77 - Honda 305cc - Dual purpose - "Gentleman's Scrambler" was a period moniker.
1967 CL175K0 - Low production number with #802 engine serial- winter 2019/2020 full restoration.
1972 CB350F - Baby Four with low mileage - Cosmetic refresh to the next level 2021/2022.
RIDERS AND FUN TOYS:
1978 CB550K - Very original bike with only 7499 Km. from new - light cleanup and refresh done.
1983 CB1100F - Canadian model - DOHC Supersport in pristine low kilometre condition from new.
1984 CX650E - Restored summer 2017 - a rare Eurosport model - excellent one owner bike.
-
Dr. Frankenstein
- Silver Member
- Posts: 739
- Joined: Sun Nov 10, 2019 7:22 am
- Location: Charlottesville, VA
Re: Problem Child
So at least it looks like you're pointed in the right direction. And seriously, I've bought carb parts from these guys several times with great results. That's their website, but they are also on Ebay too, and shipping is pretty quick. I just ordered some bowl gaskets from them for the KZ400, but haven't jumped on the carb kit yet, mostly because the OEM parts list lists like FIVE different main jets for the bike!
My carbs for the '79 KZ400H have an #80 in it, and the stock #35 slow jet, but the Kawasaki OEM Parts Diagram for the VB32 carb body for that bike lists *FIVE* for the Main Jet, 2nd: #80, #75, #78, #82 and #85.
Meanwhile, the official Shop Manual (#99997-710) allegedly for the '79 KZ400H shows a CVB36 carburetor that looks exactly like an early-model GL1000 with the silver caps, and yet the Kawasaki OEM parts diagram shows the carb that I have with diaphragms on the slides! Not to mention the KZ shop manual lists the main jets as #135, and the air jet as a #60, with a #40 pilot jet - so you can see MY confusion as well...I might just have to get a Clymers repair manual to help me figure it all out!
"It seems I am always sourcing parts for it these days." Me too! But hey: if it was easy, everybody would do it!
-
gltriker
- Honored Life Member
- Posts: 5323
- Joined: Fri Sep 24, 2010 9:11 pm
- Location: central NY State
Re: Problem Child
Yes, my engine out of frame disassembly method is Far easier said than done.Dr. Frankenstein wrote: ↑Sat Mar 05, 2022 10:32 pm Hi Cliff; as it sits now, the engine is still in the frame, and as I mentioned there is little to almost no room to get anything under there to block it up, so I figured I might be able to somehow lift the head off the pistons by pushing down on them and lifting the head up. If they're bottomed out, I wouldn't think that taking the studs out would do me any good since they're not really holding anything down - although at this point I'll try anything. Dropping the engine is becoming more and more of a reality, but at this point I really want to get the sprocket cover off first. It's like trying to husk a coconut with a screwdriver...Barb's dance card has been pretty full these days, so I haven't been able to spend as much time as I'd like in the garage - but I'll get it, somehow.
Note: I have added even more words to my suggestions for the disassembly job.
Last edited by gltriker on Wed Mar 09, 2022 1:38 pm, edited 1 time in total.
Cliff )
Keep your eyes and ears open and you'll learn something new, everyday.
New users please visit our "Shop Talk" for common tips and help: <---jdvorchak
http://www.ngwclub.com/forum/page/ST
^^^^^^^click up here^^^^^
RE: a thorough fuel tank cleaning
"And your carbs will thank you. They no longer live down stream from a sewage plant." -gregforesi
"Can't see the paint when your looking thru the handlebars..........." -Oldewing
"I'd rather Ride than Shine" -RAT Me Too!!
Cliff
'75 GL1000 home built trike; http://www.ngwclub.com/forum/viewtopic.php?f=30&t=39996
October,2017 BOTM https://nakedgoldwingsclub.com/forum/page/Welcome
previous rides:
1953 H-D Servi-car, naked, 1969-1978 (serial#53G1559 committed to memory!)
1980 CB900 Custom (triked) 1997-2003 .... R.I.P.
Keep your eyes and ears open and you'll learn something new, everyday.
New users please visit our "Shop Talk" for common tips and help: <---jdvorchak
http://www.ngwclub.com/forum/page/ST
^^^^^^^click up here^^^^^
RE: a thorough fuel tank cleaning
"And your carbs will thank you. They no longer live down stream from a sewage plant." -gregforesi
"Can't see the paint when your looking thru the handlebars..........." -Oldewing
"I'd rather Ride than Shine" -RAT
Cliff
'75 GL1000 home built trike; http://www.ngwclub.com/forum/viewtopic.php?f=30&t=39996
October,2017 BOTM
previous rides:
1953 H-D Servi-car, naked, 1969-1978 (serial#53G1559 committed to memory!)
1980 CB900 Custom (triked) 1997-2003 .... R.I.P.
-
Dr. Frankenstein
- Silver Member
- Posts: 739
- Joined: Sun Nov 10, 2019 7:22 am
- Location: Charlottesville, VA
Re: Problem Child
A little bit of an update, and a disclaimer - I have never claimed to be the sharpest knife in the drawer when it comes to motorcycles, as evidenced yesterday when I was working on the KZ400...I was just futzing around with the sprocket cover again. trying to get it to release its grip on the shift shaft and during a short break I looked at the head, which was still firmly in place on top of the block.
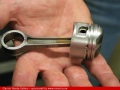
I was lamenting how I couldn't pull the darn thing up so decide to see if I could pry it up with one of the pry bars I had laying there, and Lo and Behold it just popped right up! No problems at all! I don't know why I thought I couldn't pry it up to begin with, but I did. Of course, the pistons are still stuck in it, so I worked up that board-device that flyin900 proposed and only succeeded in marring the piston crowns -
 DSCN2238 by Dr. Frankenstein1, on Flickr
Hopefully those will buff out....so anyway, after that I took a length of wooden dowel and a 5 lb. sledge to it and beat it like it owes me money (Which technically it DOES, I guess...) but still No Joy. I'll try to get some more pics on here of where the head is, but it's raised a good two inches above the case, which should give me plenty of room to beat the pistons out...more on This story as it develops.
But here's something I've never encountered before in over probably twenty old bike builds - ANTS!
The ignition switch for this bike was obviously red-neck engineered to just make the bike 'run,' so when I took off the switch cover to take out the badly-wired non-OEM switch I found THIS!
 DSCN2236 by Dr. Frankenstein1, on Flickr
I don't know if you can see 'em or not, but there is (well - "WAS") a big colony of black ants living behind the switch cover!
Now, I brough this bike home in December and never noticed (at the time) any critters living in it; it's been in my garage since then, and never outside long enough to attract any sort of insect - but what I can't figure out is HOW have they been living in there?? There's no food to speak of...what, are they eating each other?? Very weird.
I've pulled out mouse nests, wasp's nests, a bird's nest...but never a live colony of ants! That's a first!
They were moving around rather sluggishly, though, and were unresponsive to my line of questioning, so...a healthy blast of brake cleaner and No More Ants. Still - that was a First!
I was lamenting how I couldn't pull the darn thing up so decide to see if I could pry it up with one of the pry bars I had laying there, and Lo and Behold it just popped right up! No problems at all! I don't know why I thought I couldn't pry it up to begin with, but I did. Of course, the pistons are still stuck in it, so I worked up that board-device that flyin900 proposed and only succeeded in marring the piston crowns -
DSCN2238 by Dr. Frankenstein1, on FlickrHopefully those will buff out....so anyway, after that I took a length of wooden dowel and a 5 lb. sledge to it and beat it like it owes me money (Which technically it DOES, I guess...) but still No Joy. I'll try to get some more pics on here of where the head is, but it's raised a good two inches above the case, which should give me plenty of room to beat the pistons out...more on This story as it develops.
But here's something I've never encountered before in over probably twenty old bike builds - ANTS!
The ignition switch for this bike was obviously red-neck engineered to just make the bike 'run,' so when I took off the switch cover to take out the badly-wired non-OEM switch I found THIS!
DSCN2236 by Dr. Frankenstein1, on FlickrI don't know if you can see 'em or not, but there is (well - "WAS") a big colony of black ants living behind the switch cover!
Now, I brough this bike home in December and never noticed (at the time) any critters living in it; it's been in my garage since then, and never outside long enough to attract any sort of insect - but what I can't figure out is HOW have they been living in there?? There's no food to speak of...what, are they eating each other?? Very weird.
I've pulled out mouse nests, wasp's nests, a bird's nest...but never a live colony of ants! That's a first!
They were moving around rather sluggishly, though, and were unresponsive to my line of questioning, so...a healthy blast of brake cleaner and No More Ants. Still - that was a First!