My New Old Bike - 1982 Gl 1100I Rebuild

A forum for stories, pics and updates of your resto's. Be it a barn find, Grampas hand me down or a bike being brought back to it's former glory.If you are restoring it, show us your stuff!

Moderators: Brant, Sagebrush, Forum Moderators

Post Reply
User avatar
bigburlybug
Cast Iron Member
Cast Iron Member
Posts: 75
Joined: Sun May 22, 2016 11:12 pm
Location: Fort Wayne, In

My New Old Bike - 1982 Gl 1100I Rebuild

#1

Post by bigburlybug »

Hello y'all,

I've always thought I wanted to take an old motorcycle apart and make it new again. So when I saw a 1982 Honda GL 1100 Interstate on sale for $250, I bought it. A car ran into the owner into the left hand side which caused him to fall over on the right hand side. After that, they drove the bike the home with no issues, put in a barn, and covered it up. Its been sitting that way for 25 years, until I came along. So now I have a chance to see if I really will like making an older motorcycle new. I've changed tires, oil, and helped on a cv joint on a car and that's about the extent of my wrenching skills. Good thing there is this awesome website with knowledgeable people that I can go to for help.
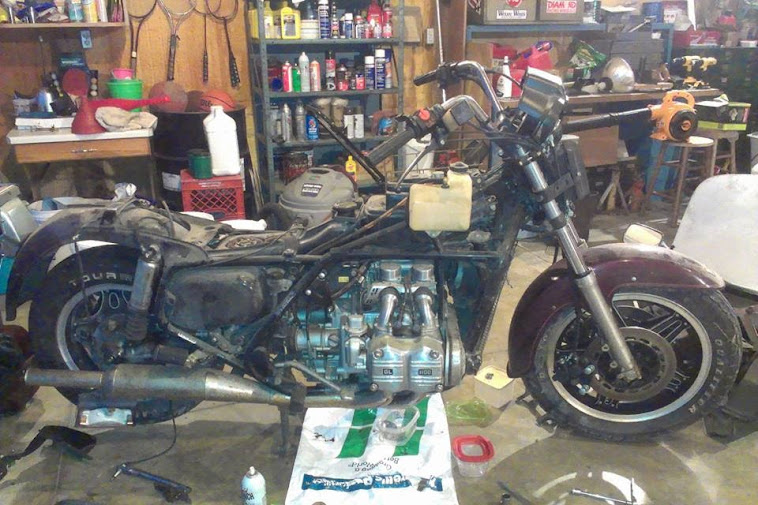
Toolbox's resurrection build is especially interesting to me since its pretty much the same scenario. Gas tank is rusty, some of the engine guard bars and saddle bag holders are bent, right saddle bag is pretty tore up, and some surface rust on all the chrome stuff. I'm sure there is gunk in the carbs and everywhere else but you'll hear more about that later. Right now I have two concerns which may or may not make me very sad.

My first concern is that the bike won't shift into first from the neutral position or into any other gear for that matter. Maybe once some oil circulates through it will be able to? I figure get the bike started first then worry about this problem.

Second concern is that I pulled the spark plugs on the right and left side. If you're sitting on the bike, the two right hand spark plug electrodes are non-existent. Kind of looks like corrosion but hard to tell. The left hand side is completely intact and looks pretty good considering 25 years of sitting. So those are the two major concerns.
The good news is that I can count on the free help of an experienced mechanic who knows a lot about everything engine related and all the fairing bolts and spark plugs came off without resorting to any lubricants. Lets hope that means no stripped screws.

New timing belts and Randakks carb kit will be on order, updates to follow.
Image
First Picture of the bike. Right side saddle bag is pretty well destroyed.
Image
Engine Guard bar is bent but seems to have done its job.
Image
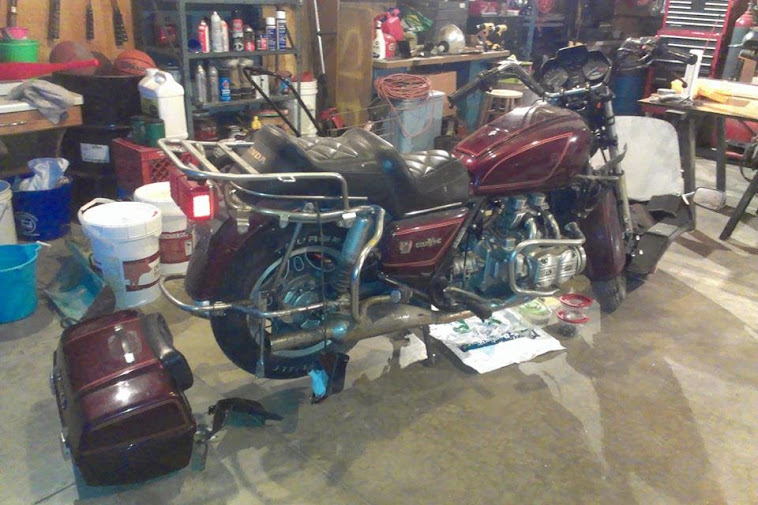
Back right Saddle Bag holder is also pretty bent
Image
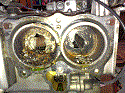
The Spark plug concern. The top two are the right side spark plugs. Note the lack of electrodes.
Last edited by bigburlybug on Mon Mar 06, 2017 8:01 pm, edited 2 times in total.
If you even dream of beating me, you better wake up and apologize! :revolver
Muhammad Ali

Bikes - 1982 Gl1100 I
User avatar
Rat
Photo Gallery Admin
Photo Gallery Admin
Posts: 15482
Joined: Fri Oct 21, 2005 9:59 pm
My Album: https://www.ngwclub.com/gallery/v/wingmans/rat/
RIP: cookie
Location: Toronto .... Canada

Re: My New Old Bike - 1982 Gl 1100I Rebuild

#2

Post by Rat »

Well ... that's one for the smart guys .... never seen such .... hope the bits are not floating around down in there ....

Gord :shock:
"I'd rather Ride than Shine"
‘14 KLR650 ... not a rat ... yet
‘84 GL1200i ‘R2B6' (Rat to Be 6, the last, adopted by twowings)
My Original 'RAT' was a hybrid '82 CB900/1100F
User avatar
toolbox
Titanium Member
Titanium Member
Posts: 489
Joined: Sun Feb 28, 2016 1:54 am
Location: Montana

Re: My New Old Bike - 1982 Gl 1100I Rebuild

#3

Post by toolbox »

Hey, welcome to the club! party2 You're right, it looks like a doppelganger to my own...kind of funny that both bikes took sort of the same path in life. They're almost the same bike, though mine had more lights on it than a Christmas tree lol. I wouldn't worry too much about the shifter just yet...my Shadow did the same thing when I dragged it home, and it worked out fine. I'm not sure if the clutch was sticking or what, but it worked itself out. Not sure on the plugs? Maybe someone else can answer you...that's pretty odd. Don't be surprised if you have to pull that head off to see what's going on in there...
Anyway, welcome aboard...if you've read through my thread, then you've got an idea of what you're looking at :) . I've worked on everything from 1950s cars to mid-2000s stuff, and everything in between, and I gotta say--the GL1100 has been one of my favorites to wrench on. Compared to a transverse mounted V6 shoehorned into a modern car, it's a real dream :lol: . Take your time, and you'll do fine. And if you haven't done a bunch of carbs, get the book to go with the carb kit...
User avatar
bigburlybug
Cast Iron Member
Cast Iron Member
Posts: 75
Joined: Sun May 22, 2016 11:12 pm
Location: Fort Wayne, In

Re: My New Old Bike - 1982 Gl 1100I Rebuild

#4

Post by bigburlybug »

Its good to hear about the shifter problem working out toolbox. I was reading some cases where people had to split the case in half and all kinds of horrible stuff. So far I've been happy wrenching on the bike too. Relatively easy to get to and no stuck bolts dancr . Anything else i work on always seems to have stuck bolts. I've yet to get to the hard stuff though.

You're thread is pretty much the reason I bought the bike. It sounded like a similar situation and so well documented that I figured I could follow along. I'm for sure getting the book with the carb kit, its my first time so progress will be like a herd of turtles.
If you even dream of beating me, you better wake up and apologize! :revolver
Muhammad Ali

Bikes - 1982 Gl1100 I
User avatar
Patriccio
Silver Member
Silver Member
Posts: 984
Joined: Thu Mar 07, 2013 3:57 pm
Location: San Diego, Ca.

Re: My New Old Bike - 1982 Gl 1100I Rebuild

#5

Post by Patriccio »

Holy Shamoly! You have tennis rackets on the garage wall, so I'm hoping you're not planning on playing some new type of polo w/ the GW. Do the Randakk thing to your engine before starting. Everyone here will say something like, "Change the belts." Bench grinder, metric tools, patience, & you're almost done. Have a great time. It's a great machine.
If there is one thing I have learned throughout this process it is this: Check your respirator for spiders before you put it on.
User avatar
toolbox
Titanium Member
Titanium Member
Posts: 489
Joined: Sun Feb 28, 2016 1:54 am
Location: Montana

Re: My New Old Bike - 1982 Gl 1100I Rebuild

#6

Post by toolbox »

bigburlybug wrote:Its good to hear about the shifter problem working out toolbox. I was reading some cases where people had to split the case in half and all kinds of horrible stuff. So far I've been happy wrenching on the bike too. Relatively easy to get to and no stuck bolts dancr . Anything else i work on always seems to have stuck bolts. I've yet to get to the hard stuff though.

You're thread is pretty much the reason I bought the bike. It sounded like a similar situation and so well documented that I figured I could follow along. I'm for sure getting the book with the carb kit, its my first time so progress will be like a herd of turtles.
Yea, you never what you're going to find in there until you start looking :) . If I'd just dragged that home, I'd probably start by draining the fluids and seeing what they look like...they can give some insight into what the innards might look like, and they have to be changed anyway. Since you have to change the belts, you might see if you can pull the timing covers and turn the engine over by hand...I wouldn't crank on the starter until you know it will (and the oil has been changed). It wouldn't hurt to put some ATF or MMO in the cylinders before you try and turn it over too, since they're going to be dry as a bone. I'd be a little concerned about those missing electrodes...you might want to use something like one of those Harbor Freight bore scopes to take a peek into the cylinder (or just remove it...that would give you a chance to clean everything up too).
Anyway, these are a great bike to start on...everything you'll need to do to it has been documented (and really well in most cases), and used parts are as cheap as they get, in addition to being pretty easy to work on. Download the FSM before you get too far, it's handy to have on the bench with you.
Looking forward to seeing your progress :). If you're just going to make it into a runner, it shouldn't take that long...I'd have mine on the road by now if I wasn't doing a bunch of goofy custom stuff with it :lol: .
User avatar
bigburlybug
Cast Iron Member
Cast Iron Member
Posts: 75
Joined: Sun May 22, 2016 11:12 pm
Location: Fort Wayne, In

Re: My New Old Bike - 1982 Gl 1100I Rebuild

#7

Post by bigburlybug »

Don't look! SHES NEKKID! Image

I was able to pull off the fairings, false tank, and saddle bag bars. I had trouble with the right side engine guard since it was bent up pretty good. But with a little bit of force and a little bit of fiddlin , it came off. I'm liking it better already. Image

Whats not so pretty is the fuel sending unit.
ImageIts immobilized with rust which doesn't bode well for the tank and carbs. I had wishful thinking that a couple cans of seafoam might work but no longer. I'll be sure to get the book with Randakks kit as well, and watch youtube videos, aaand read about it for a while type1 . First time doing carb work so we'll see how it goes.

Two timing belts, two oil filters, and four spark plugs came in today. I'm leaving for the weekend so the timing belts will have to wait till next week. I'll drain all of the liquids tomorrow and see what they look like. Another reason I bought this bike was because I wanted to learn on work on stuff. So I'll probably tear apart anything that is likely to need refurbishment for the learning experience and to make the bike reliable.

The first goal is to get it to run. Second goal is to get it similar to this bike http://milchapitas-kustombikes.blogspot ... ustom.html Image. Maybe with a different paint scheme, burnt orange possibly. I also like to camp and climb so having saddles bags would be nice. How to fit all that together is future thinking.

Third, and most importantly, is to play polo with tennis rackets with a bunch of people on goldwings :crosso .
Last edited by bigburlybug on Mon Mar 06, 2017 8:04 pm, edited 1 time in total.
If you even dream of beating me, you better wake up and apologize! :revolver
Muhammad Ali

Bikes - 1982 Gl1100 I
User avatar
toolbox
Titanium Member
Titanium Member
Posts: 489
Joined: Sun Feb 28, 2016 1:54 am
Location: Montana

Re: My New Old Bike - 1982 Gl 1100I Rebuild

#8

Post by toolbox »

Looking good! You might try and give the sender a cleanup...mine looked exactly the same when I pulled it out of the tank. It was full of disgusting varnish, but looked great after ultrasonic cleaning. If it's rust and not varnish, electrolysis would probably clean it up. The tank probably looks like mine did too...if you do a search, you'll see all kinds of different ways to clean them. I didn't want to take mine out of the bike, so I used electrolysis with it in.
TONS of great info on building a cafe on this site obviously...the only thing on that particular one that might pose a challenge for you is they cut the rear frame horns and welded in a hoop to support the seat...
Looks like you're off to a great start though...keep it coming :).
User avatar
bigburlybug
Cast Iron Member
Cast Iron Member
Posts: 75
Joined: Sun May 22, 2016 11:12 pm
Location: Fort Wayne, In

Re: My New Old Bike - 1982 Gl 1100I Rebuild

#9

Post by bigburlybug »

Thanks for the sending unit suggestion Toolbox. I took a rag to the sending unit and a large majority of the junk came off; it wan't nearly as bad as I though it was :-D . Later on I'll give it a good clean down and see if it still works.

The tank is pretty rusty and it looks like a big pain to get out. I've done some electro etching before so I'm partial to the in -frame electrylosis method as well. Did you coat the tank after it was clean Toolbox?
I'm toying with the idea of copper coating it by switching the polarities, filling the tank with copper sulfate (algae killer/fungicide), and using a copper pipe as an electrode. Any thoughts? Just top it off with gas and seafoam every winter?

I ordered Randakk's kit with the book on wednesday so if that comes in, carb work is happening next weekend.
If you even dream of beating me, you better wake up and apologize! :revolver
Muhammad Ali

Bikes - 1982 Gl1100 I
User avatar
toolbox
Titanium Member
Titanium Member
Posts: 489
Joined: Sun Feb 28, 2016 1:54 am
Location: Montana

Re: My New Old Bike - 1982 Gl 1100I Rebuild

#10

Post by toolbox »

bigburlybug wrote:Thanks for the sending unit suggestion Toolbox. I took a rag to the sending unit and a large majority of the junk came off; it wan't nearly as bad as I though it was :-D . Later on I'll give it a good clean down and see if it still works.

The tank is pretty rusty and it looks like a big pain to get out. I've done some electro etching before so I'm partial to the in -frame electrylosis method as well. Did you coat the tank after it was clean Toolbox?
I'm toying with the idea of copper coating it by switching the polarities, filling the tank with copper sulfate (algae killer/fungicide), and using a copper pipe as an electrode. Any thoughts? Just top it off with gas and seafoam every winter?

I ordered Randakk's kit with the book on wednesday so if that comes in, carb work is happening next weekend.
My sending unit cleaned up great, and I tested it with a multimeter when I was done...it was definitely working, but I couldn't find what the correct resistance values should be anywhere...if you want a reference to compare to you can see them in my build threat...might give you a ballpark of what to look for anyway.

And yes, the tank is a pain to get out (and back in). If you search here you'll find a few discussions about it... A lot of guys coat their tanks, but I didn't bother...the vast majority of vehicles I've owned are more than 20 years old (many a lot older), and it's never really been an issue for me. I got lucky on my Shadow...the tank was rust free even after sitting outside for more than a decade (the paint was toast, but that's another story :)). The wing...yea, not so much :lol: . For winter storage, I would just make sure it's topped off (non-ethanol gas might not be a bad idea)...add some stabil and call it good. I pull the Shadow out at least once a month in the winter and let it run until it's nice and warm, just to get the fluids circulated and charge the battery. Honestly, I think rust only becomes an issue when these things sit for years on end, either with moisture getting in there and not evaporating, or with the same fuel sitting in them for years on end. OTOH, coating it will make the repair permanent and certainly gives peace of mind... Copper plating it is an intriguing idea...no idea how well it would work in this application, but if you try it definitely post the results.

And good luck with the carbs...let us know how it goes. Some guys take all of them apart at once, but I like to do them one at a time. One thing I would recommend is having a hollow ground screwdriver (or bit set) handy to remove the jets...they're not a requirement, but can keep them from getting chewed up if they're stuck. If you don't have access to an ultrasonic machine, boiling them is probably the next best thing...doing it on a camp stove or something outside tends to keep family members more interested in your project as well :lol: .
User avatar
Easter
SUPER BIKER!!!!
SUPER BIKER!!!!
Posts: 3000
Joined: Thu Sep 13, 2012 11:33 am
Location: South of Houston 100 miles

Re: My New Old Bike - 1982 Gl 1100I Rebuild

#11

Post by Easter »

Regarding coating the tank, not all coatings are equal and if the tank isn't clean enough when you put it on it can flake off and then you have a real mess. My preference whenever possible is just clean the tank really well then keep it full of gasoline.

You made a great purchase for $250 but as anyone here will tell you that is only the beginning. If it turns out the transmission is damaged, maybe from the wreck, or if the engine turns out to be shot, it is usually far better to look for a good transplant than to try to open it up and make internal repairs. New parts are hard to come by and expensive.

Best of luck with the project.
Bikes at present:

83 XL 600r with a 2004 XR650L engine
And a slightly worse for the wear BMW GS adventure bike awaiting repair
83 GL in process :IDTS:
User avatar
bigburlybug
Cast Iron Member
Cast Iron Member
Posts: 75
Joined: Sun May 22, 2016 11:12 pm
Location: Fort Wayne, In

Re: My New Old Bike - 1982 Gl 1100I Rebuild

#12

Post by bigburlybug »

Thanks for all of the good info, keep it coming :) With all of this help I'll be drivin in no time crossy.gif .
My sending unit cleaned up great, and I tested it with a multimeter when I was done...it was definitely working, but I couldn't find what the correct resistance values should be anywhere...if you want a reference to compare to you can see them in my build threat...might give you a ballpark of what to look for anyway.

Toolbox, I searched google and Randakk seemed to have the info party2 surprise! but not really because Randakk knows everything.
You can use a digital ohm meter to make sure that your sending unit is within the following factory specifications: 1975-1979 GL1000 — 65-75 ohms empty, 10-15 ohms full 1980-1983 GL 1100 — 75-80 ohms empty, 6-10 ohms full 1984-1987 GL1200 — 101-110 ohms empty, 43-52 ohms full.
http://www.randakksblog.com/fuel-sender-issues/ This is what we need right?

For the copper coating, I might try a small piece of metal first to see if I can coat it well and see what happens from there for the tank.

I know the people I bought the bike from and believe them when they say they drove it home with no problems after the wreck. How likely is it that a problem worthy of a replacement motor occurs from the bike sitting 25 years?
If you even dream of beating me, you better wake up and apologize! :revolver
Muhammad Ali

Bikes - 1982 Gl1100 I
User avatar
Easter
SUPER BIKER!!!!
SUPER BIKER!!!!
Posts: 3000
Joined: Thu Sep 13, 2012 11:33 am
Location: South of Houston 100 miles

Re: My New Old Bike - 1982 Gl 1100I Rebuild

#13

Post by Easter »

Not too likely. Or none of us would be riding old Wings. Most of them have been setting that long. lolol
Bikes at present:

83 XL 600r with a 2004 XR650L engine
And a slightly worse for the wear BMW GS adventure bike awaiting repair
83 GL in process :IDTS:
User avatar
bigburlybug
Cast Iron Member
Cast Iron Member
Posts: 75
Joined: Sun May 22, 2016 11:12 pm
Location: Fort Wayne, In

Re: My New Old Bike - 1982 Gl 1100I Rebuild

#14

Post by bigburlybug »

That's good to know. I found this great post http://classicgoldwings.com/forum/viewtopic.php?p=2143 that goes through what I figured was a good series of steps and it drained all of the fluids like Toolbox suggested. So I read and looked at schematics and then read
Drain the oil by removing the bolt under the filter with your 17mm wrench.
Easy enough, (rattle, rattle, 8 mm, 19 mm, 7 mm, dangit wheres the 17 mm?, 10 mm, 12 mm, 12 mm, 12 mm Darvit!, 11 mm, 6 mm SHIoh, there it is) a little force to break it and it unscrewed nice and easy. Once it came unscrewed I thought, "Man that is a nice green color" but it was coming out pretty fast and needed another non-oil bucket to catch it. Since I unscrewed the wrong bolt, I started wrenching on the bolt right next to the one I just undid since I wanted oil, not coolant. The socket didn't fit though so I read through the tutorial again.
Drain the oil....with your 17mm wrench
. That's when I realized I unscrewed the right bolt and copious amounts of coolant was coming out of the oil drain confused22 . I don't know how bad this issue is but it is definitely going to be more work. Maybe the head gasket? The oil also had some nasty junk that came out. Image
I followed along with the rest of the tutorial which checked a couple of things. The coolant itself was a vibrant green and seemed pretty good and clear, maybe a little oil. Image

The cooling fan works just dandy and the water pump didn't wiggle back and forth and rotated only a slight amount which is supposedly acceptable. I didn't know where the weep hole was so didn't check that. I wasn't quite sure where to put the spanner wrench to turn the engine so I left that for later as well. The radiator and hoses also looked clean enough that I'll put boiling water in it and call it good. The coolant hose looks good but I might replace it anyways for the $10. I pulled off the timing covers and everything inside looked pretty clean :guitar . Image
but that's all I did with it.
One other thing I noticed was that the backing timing chain plate on the right (wrecked) side was bent a little bit. Image
Can I just bang that back into place assuming all the important moving parts don't wobble?

I'll be working on it more this week checking a few more things. If the motor moves, remove the starter and see if that works, and turn on the electric.
Last edited by bigburlybug on Mon Mar 06, 2017 8:08 pm, edited 1 time in total.
If you even dream of beating me, you better wake up and apologize! :revolver
Muhammad Ali

Bikes - 1982 Gl1100 I
User avatar
toolbox
Titanium Member
Titanium Member
Posts: 489
Joined: Sun Feb 28, 2016 1:54 am
Location: Montana

Re: My New Old Bike - 1982 Gl 1100I Rebuild

#15

Post by toolbox »

Hmmm...I did say you can learn things by draining the fluids... ;) . While certainly not what you would hope to find, it might not be a death sentence for the motor... I'm not very familiar with the GL engine and how coolant and oil circulate though it, but with motors in general when you get coolant into the crankcase it's though a blown head gasket, a crack in a head, or a crack in the block. If they rode it home it seems unlikely (but certainly possible) it's the head gasket...I would probably put my money on a crack in one (or even both) of the heads from the bike landing on them, though someone else may chime in with a more GL specific answer. Even a small crack could drain a lot of liquid if it had 25 years to do it... You might want to just pull the heads at this point and see what you find...you're actually only a few bolts away from being there right now anyway. I'm guessing that will answer a lot of your questions...

If the plugs are out, you can try turning the engine over via the bolt in the front center of the motor...that's the end of the crankshaft . If it doesn't want to move easily, don't torque on it, just wait until the heads are off.
On the timing pulley backing plate--you might be able to straighten it...its' cast aluminum so there's a limit to how much it will like being bent around. Mine was trashed, and the one on my replacement head was bent too, so I just found one on ebay that was straight. I think I paid about ten bucks for it.

The good news is the coolant may or may not have done any damage...water sinks to the bottom of the oil pan, so if the level of the fluid in there was driven up into the internal components, they may have only been sitting in oil... And on the bright side, what you're doing right now is the absolute best way to learn how to wrench :)
Post Reply
  • Similar Topics
    Replies
    Views
    Last post

Return to “Members Restorations and Projects”