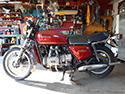

Full length side shot. The exhaust looks close but is the angle of the picture, it actually has over 7" on the upside when on the sidestand, straight up is slightly over 6" with me on it....depending on my last meal.

Left side. The red doodad is an aircraft fuel shutoff, I installed that so I didn't have to keep reaching under the tank every time I parked it. Just noticed I forgot to replace the SS screw in the top of the fuel valve mounting plate.

I fabbed up the sidemount plate and taillight holder, then after cutting the back end of the frame off I added the smaller LED lights. The outer lights are run/turn...made the standoffs for them, the two inner lights are run/brake along with the taillight over the plate. This pic is when in the "run" mode, they're quite bright when on high....just like I wanted.

The cockpit, I adapted this gauge in place of the OEM units. They needed too much work for my taste, and I thought they were kinda ugly anyway. This gauge gives me everything but temp and oil pressure, the temp is on the left, oil pressure is the red light you can see underneath on the right side. With the gear indication harness on the '85 SEi motor I installed, this gauge also shows that on the right side, just above where my clock is reading the incorrect time of 1:03. I did have to fabricate a mount for the gauge. Since I'm using a Hall effect speedo pickup from an Interstate Valkyrie, that made the speed readout off quite a lot. I mounted a GPS and found going down the street at ~18mph, the readout was 127....so I ordered a Speedo Healer. Wired it in and all's well in paradise. One issue was the Valkyrie tank doesn't have a sending unit which made the gauge constantly flicker, telling me I was out of gas. I found the OEM sending unit approximate resistance and installed a small resistor in the circuit. The gauge now always shows full but the constant flickering is gone.

Front shot. The headlight was originally a chrome Adjure, I found with the extra wiring in my creation the OEM bucket didn't have room for it but the Adjure did. I sanded the chrome, used self-etching primer and then satin black with a couple coats of clear which all polished out quite good. The front turns match the rears and operate the same way; run/turn. The shield behind the headlight is just that....a shield. There's a lot of extra wiring going on in there and this just covers it up. The handlebars and controls are from a Valkyrie and I adapted them to the 1200 wiring harness.

You've probably all seen this picture accompanied with "change your belts." This is what I started with, the former owner or mechanic had replaced the belts but obviously didn't know what he was doing. I was able to remove the belts without loosening the tensioners, I checked the timing before doing so and it was off the marks by over an inch on the left side but the three remaining pistons showed signs of valve strikes. At first I replaced the bad piston & rod(this is #4), I honed both left cylinders but couldn't get all the deep scratches out. I got it running but had a bad vibration so decided to chuck it and try another motor. Ended up getting a 43k mile '85 fuelie which I converted to carbs since I'd already gone through them.

So, there it is....such as it is. I'm sure I've forgot some items, my coils are off a Valkyrie, I had to make a tool to create the small lead knob on the end of one throttle cable and a shortened choke cable. Everything is either new or rebuilt....except the engine and rider. The forks were totally dismantled, cleaned and are all new. All calipers are rebuilt and have new pads, the clutch and brake lines are all new SS, new bearings in both wheels, final drive fully serviced. The brakes were modified by blocking off the front port on the rear m/c, thereby isolating the rear brake to just the foot lever. The fronts work fine using the hand lever, I had to install larger controls however. I went from 14mm to 16mm on both m/c and finally got the action I wanted. I mounted a splitter under the headlight, all brakes are fine now. As soon as I trim down the seat pan(Corbin) I'll be getting it covered, then put some miles on it before selling just to make sure there's no bugs. I have a lot of pictures but since this involved a long period of time I decided to not post them. I did find one thing extremely helpful when working on the engine and carbs; a lift table from Harbor Freight. It puts everything at the right height for me so I can sit down in a regular chair and work on stuff. In the final analysis, it's actually a bit scary to ride if you don't control that right hand. It's quick and fast so if I happen to scratch that "itch" I need to hang on....really tight.