
I have found this forum to be the most useful of all the old goldwing forums and so wanted to share my learning and modification experience. I will endevour to post references back to the relevant threads whenever I get to sections where I used forum info.
First of all its best to start with the motivation. I enjoy sports and muscle bikes but as I have got a little older I've found myself tending to rebuilding older bikes in an attempt to resurrect machinery that otherwise may have been no too far from the scrap heap or being stripped out for parts. This has the added advantage that often these bikes come at a fraction of the cost of newer models and when finished might be a little rarer than a more modern modified bike ( I won't get going on the disadvantages as they are more plentiful than the advantages). Unique engine configurations interest me and that is how the final choice came down to a beaten old ducati 600SS (which looked like it had been crashed a few times, driven off a cliff then set fire to) or a more loved old goldwing that was just a few decades shy of any proper maintenance. The GL won due to the distinct flat four engine note that reminded me of my first car an old 71 beetle. Despite the will to modify I am somewhat of a purist and would not be OK with chopping or changing too much a pristine example of an older or rare machine, hence the rectification of scrap mentality.
The will to cast all of the body and non load bearing parts out of carbon fibre comes as I am trying to make some decent, lightweight load bearing snow shoes for guests to use at my house in the mountains and so need more practice, making molds, working with raw High Density twill weave and setting in resin.
Finally, I am a car park mechanic. I have no vice, minimal tools, no machinery other than a dremel and have to make do in some cases if trying to keep costs down. In that respect I try and live like an original and true cafe racers builder. Making do with what I have and doing my best to shed weight and customise what I already have.
This build has already burst the budget a bit so I may be failing...........
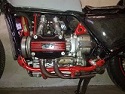
ANyway, the starting point, a true outback bush bike, bought from the hills of Perth from a genuine friendly fellow. I bet it would have some stories to tell if it could talk.
- IMG_5279.JPG (54.08 KiB) Viewed 905 times
- IMG_5284.JPG (59.05 KiB) Viewed 905 times
- IMG_5283.JPG (73.09 KiB) Viewed 905 times


