My Wing: progress shots

A forum for stories, pics and updates of your resto's. Be it a barn find, Grampas hand me down or a bike being brought back to it's former glory.If you are restoring it, show us your stuff!

Moderators: Brant, Sagebrush, Forum Moderators

Post Reply
User avatar
Alley Kat
Silver Member
Silver Member
Posts: 711
Joined: Thu Apr 12, 2007 4:11 pm
Location: UK

My Wing: progress shots

#1

Post by Alley Kat »

Hope this is OK to post with all the pics; some progress on my K3.
Redone the carbs with Randakks excellent kit. First pic is after a lot of cleaning...
Image
Want to avoid shine and Liberace effects.. plus i hate doing polishing, so mixed up a gunmetal blend for some parts:
ImageImage
Image

Airbox after first round of sanding:
Image
And after 2k prime, hi-build, straight black: I must be mad, can't even see this now...
The cover plate at the rear of the dummy tank is shown too.
ImageImage

Got some covers with the bike, yrs old, so polished them up. Shown with the originals for comparison:
Image Image


I'd repaired, tidied and painted my exhausts before, they looked like below. Had also prepped and painted the stock taillight unit and stuff.
Image
But when it came to assembly time I didn't like the look, so there & then whipped off the mudguard and cut it short (10" long) and re-shaped a bit. Decided the cans were too long, so chopped them too. Made a new baffle, couldn't use the original and didn't like the resonator/backpressure system it used anyway:
Image
Image
Image
Cans painted in the same gunmetal mix I made:
Image

Started on a bar and light setup to fit between the rear frame horns. Lights cost £8/$16, reshaped the ally backplate and painted with the same gunmetal.
Image
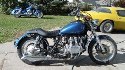
In place now for rough fit. Had cut some bits off the frame horns, and the smaller indicators, and a start on reshaping the seat base can be seen too:
Image

All the steel and ally and paint materials were laid around here already inc paint, so cost £0 really. The covers came with the bike. Lights cost £8/$16 rear, and £20/$40 for 2 sets of indicators. My better half is going to re-foam the seat and make a cover for it (she does upholstery & sewing). The seat will be about 1.5" maybe 2" deep.

That's it for now. Back to the shed to finish the belts and polish the paint on the body panels now.
User avatar
Zryder
True Blue Steel Biker
Posts: 2954
Joined: Tue Dec 14, 2004 2:12 pm
My Album: http://www.ngwclub.com/gallery/v/wingmans/zryder/

#2

Post by Zryder »

Dang it Alley Kat , you've been busy eh ! The gun metal paint looks great .Thats what I'll be doing this off season is cosmetics . Thanks for sharing ,. later .
1982 GL 1100 std. Custom Image
To my album ; http://www.ngwclub.com/gallery/v/wingmans/zryder/
User avatar
Dirty_D
Billet Alum. Member
Billet Alum. Member
Posts: 250
Joined: Wed Aug 15, 2007 6:25 pm
Location: Clarksburg,MD
Contact:

#3

Post by Dirty_D »

You have done a wonderful job!! I love the tailight/tag bracket!
78 GL1000...Giddy up!
User avatar
BIG T
Gold Member
Gold Member
Posts: 1368
Joined: Sat Dec 04, 2004 12:42 am
My Album: http://www.ngwclub.com/gallery3/index.p ... ustom_wing
Location: U.S.A.

#4

Post by BIG T »

ABSOLUTLY BEAUTIFUL...T[/b]
please donate to keep this site alive.

admit nothing, deny everything, demand proof!
User avatar
octane
SUPER BIKER!!!!
SUPER BIKER!!!!
Posts: 3763
Joined: Sat Jun 11, 2005 3:24 pm
Location: Denmark

#5

Post by octane »

Absolutely brilliant!
Please keep us posted!


Could I persuade you to post a close-up / side-shot
of the rear-light/mudguard ('fender' for you fellas
on the wrong side of the pond .-)
.. really like what you did there!


Thanks !
User avatar
BLACKGOLD
Silver Member
Silver Member
Posts: 798
Joined: Tue Mar 01, 2005 7:39 pm
My Album: http://www.ngwclub.com/gallery/v/wingmans/BLACKGOLD/
Location: Aurora, CO

#6

Post by BLACKGOLD »

Nice job!
Mike

Elvira-1980 GL1100 Custom
Black Betty-2000 HD Electra Glide

"we are on the cutting edge of cocking about" -Richard Hammond
User avatar
Alley Kat
Silver Member
Silver Member
Posts: 711
Joined: Thu Apr 12, 2007 4:11 pm
Location: UK

#7

Post by Alley Kat »

Wow, gents, thank you all so much for the nice words. Means a lot, Life and stuff has got in the way lately and it's been really delayed, was really getting me down. Nice one.

Couple more pix: the m/guard mid-chop, and after modding. Cut bits out, beat it about a little bit. Roughed up and then 2k epoxy primer, hi-build, and straight graveyard black.
Image
Image
Start of seatbase hacking:
Image

The back light bar thing is a 1" tube, with end pieces out of 3mm, hole drilled and a nut welded on the inside. Stainless button-head bolts lock it into place through the horns. Its got a L-bracket to hold the light backing plate. Tthe thing tucks under the mini-mudguard. Hope the number plate will sit OK without meeting the tyre..... the thing can swivel so should work (fingers x'd).

The frame's painted (in situ) and the engine too, not too happy with the result of that but it'll have to do. Next up is a brake rebuild, i'm going to try a Yam R1 master cyl just cos it was on the shelf. And maybe hack the front mudguard a little and squirt it black or gunmetal. Can't wait to get her rolling....!

(o yes and some lightly higher & straighter bars would be nice, if the stock cables & hose will allow it)
User avatar
RebelRouser
Webmaster (Retired)
Webmaster (Retired)
Posts: 7198
Joined: Sat Sep 17, 2005 8:44 pm
My Album: http://www.ngwclub.com/gallery/v/wingmans/rebelrouser/
Location: The Dalles, Or.
Contact:

#8

Post by RebelRouser »

Alot Of Great Work There.... Keep It Up... 8)
If You Didn't Build It, Customize It, And/Or Modify It, Then It Truly Isn't Yours. Rebel Rouser
User avatar
spaniard
Titanium Member
Titanium Member
Posts: 370
Joined: Tue Jun 06, 2006 8:48 pm
Location: Elizabethton, TN

#9

Post by spaniard »

it is one unique and very cool bike. Keep us posted!
[img]http://www.nakedgoldwings.com/albums/album125/100_1821.thumb.jpg[/img][img]http://www.nakedgoldwings.com/albums/album125/100_1819.thumb.jpg[/img]

FOR SALE
User avatar
Alley Kat
Silver Member
Silver Member
Posts: 711
Joined: Thu Apr 12, 2007 4:11 pm
Location: UK

#10

Post by Alley Kat »

Thanks a lot guys....
Not much progress today, started polishing my panels I'd painted a while back. Found one needs some re-doing, and i burnt through some paint on the frame :roll: The lettering was done with images I made on the PC, then got 'applimasks' cut by a signmaker shop. Stripes were masked out and them & the letters airbrushed.
Image
User avatar
Scooby79GW
Zinc Member
Zinc Member
Posts: 36
Joined: Mon Jul 16, 2007 12:02 am
Location: Iowa

#11

Post by Scooby79GW »

beautiful work.... keep the pics a coming
79 goldwing in progress
User avatar
enjoytheride
Cast Iron Member
Cast Iron Member
Posts: 84
Joined: Tue Oct 23, 2007 8:49 am
Location: Panama City, FL

#12

Post by enjoytheride »

Nice work :-D Love the idea for the covers
Keep Riding :)
User avatar
octane
SUPER BIKER!!!!
SUPER BIKER!!!!
Posts: 3763
Joined: Sat Jun 11, 2005 3:24 pm
Location: Denmark

#13

Post by octane »

I'm just downright impressed !

Please keep us posted.
Thanks!
User avatar
Geno
Billet Alum. Member
Billet Alum. Member
Posts: 246
Joined: Mon Jul 09, 2007 12:12 am
Location: Montague MI. USA

IMPRESSIVE!

#14

Post by Geno »

Man Alley Kat, that is excellent work, I love the detail on the engine, and the fender and tailight mount is exacltly the type of customizing that sets this forums members apart from all the others. Way to go. Please keep us updated, Geno.
On Ebay= genesvintageparts email=genemohney@msn.com.
78 GL1000
82 Virago XV920J
83 Virago XV920K
My album http://www.nakedgoldwings.com/gallery/album198
User avatar
s78wingrider
Titanium Member
Titanium Member
Posts: 324
Joined: Thu Aug 16, 2007 10:21 am
Location: old fields wv usa

#15

Post by s78wingrider »

dancr lookin good kat :!:
aaron a welton III
Post Reply
  • Similar Topics
    Replies
    Views
    Last post

Return to “Members Restorations and Projects”