Been helping a buddy in Patterson Ca. with a smoking 1200. Although it goes against the grain for me, I decided to try the head on method of valve stem seal replacement. Read the "how to" and it seemed simple enough.
Observations:
Valve spring compressors:
What we found was that not all "head on" valve spring compressors will do the job. Napa (2 types), Harbor Freight and a borrowed KD tools one from a local garage would not do the job.
The problem with the HF and Napa screw types is the leg length difference is 2 great. The difference of these 2 legs is 1/2 inch which will not allow you to get the ends in on the same part of the spring 1/2 a turn apart. It will only grab on the next turn of the spring.
The KD tools one was the correct leg length spacing but the tips will not grab on to the inner spring and sometimes the inner spring would force the tips to close to edge of the outer spring for comfort! The second Napa one was a hand lever type with the correct leg length difference but the bend angle on the tips of the legs was so extreme it would not go in the gaps in the spring.
The solution.....Both the Napa and the HF screw type ones came out of the same far eastern factory and are more or less identical. We ground the rivets of the short leg on 1 and the long leg on the other and swapped them. We ended up with 2 compressors with equal length legs. Both work and are within the screw range for these valves so we now have one each! Cost was $16 for HF and $20 for Napa. A pair of either will work.
Use of compressed air:
Unnecessary and we didn't us it. If you put pistons 1 and 2 at TDC and replace the stem seals on cylinders 1 and 2 you won't need air. The valves at this position will only travel about 1/4 inch in before they touch the piston crown so no danger of loosing the valve inside. The new seals were enough to hold the valve in place while the collets (keepers here?) were inserted by hand as there is enough room to manipulate them with your fingers with these valve spring compressors. Pull back on the valve so that the top spring cover holds the keepers in place and release the valve spring compressor slowly.
When you are done with 1 and 2 turn the crank to 2 and 4 TDC and repeat with those 2 cylinders.
It is fairly obvious if the collets are seated correctly but it is advisable to tap the valve heads sharply with a soft faced hammer to make sure they are seated. Do not do it without moving the crank away from the TDC that you were using or you will hit the piston! A quarter crank turn from either TDC mark puts all the pistons out of reach of all the valves.
If you are not sure (which we weren't initially) how far the valve will go in at TDC, remove the spring on either of the exhaust valves for which the pistons are at TDC and try it. There is no danger of the valve dropping in as it will fall shut naturally. The amount the valve will travel in will probably be different for 1000s and 1100s but can't see them being able to fall inside!
Hope this helps
Valve stem seal replacement head on notes
Moderators: CYBORG, Oldewing, robin1731, Forum Moderators
-
Qui-gon
- Silver Member

- Posts: 687
- Joined: Sat Feb 19, 2011 7:03 pm
- Location: Lantana, Fl.
Valve stem seal replacement head on notes
1975 GL1000 Sold!
1976 GL1000 "GL1's evil twin" Supercharged cafe racer. Build thread Here
1977 GL1000 Black sorta resto project!
Now in Florida working for a living Ugh!.....projects on hold mostly!

1976 GL1000 "GL1's evil twin" Supercharged cafe racer. Build thread Here
1977 GL1000 Black sorta resto project!
Now in Florida working for a living Ugh!.....projects on hold mostly!
-
dan filipi

- Platinum Member

- Posts: 1696
- Joined: Tue Nov 21, 2006 10:22 am
- My Album: http://classicgoldwings.com/forum/galle ... album_id=1
- Location: Reseda, California
- Contact:
Re: Valve stem seal replacement head on notes
Did the new seals fix the smoking problem?

-
Ken L.

- Titanium Member

- Posts: 453
- Joined: Sat Mar 06, 2010 10:30 pm
- Location: Cincinnati, OH.
Re: Valve stem seal replacement head on notes
Pictures...Pictures... We need pictures of the modified tools.
Thanks
Ken L.
Thanks
Ken L.


2005 GL1800 Dark Grey Metallic, \ CSC Trike
1975 GL1000 Red (Owned since 1980)(Given to my other son)
1976 GL1000 Red (being restored)(Given to the Jones boys)
1978 GL1000 Black, dressed (Given to my son)
1985 Aspencade bought brand new, traded and now back home.
Ham Radio W8BUY
-
Qui-gon
- Silver Member
- Posts: 687
- Joined: Sat Feb 19, 2011 7:03 pm
- Location: Lantana, Fl.
Re: Valve stem seal replacement head on notes
Dunno yet as it needs new hoses. Will know tomorrow but the old seals were pretty badly burnt around the top. The original seals were a light brown in colour with black crispy bits where they seal on the stem! Will try and photo them later.
1975 GL1000 Sold!
1976 GL1000 "GL1's evil twin" Supercharged cafe racer. Build thread Here
1977 GL1000 Black sorta resto project!
Now in Florida working for a living Ugh!.....projects on hold mostly!
1976 GL1000 "GL1's evil twin" Supercharged cafe racer. Build thread Here
1977 GL1000 Black sorta resto project!
Now in Florida working for a living Ugh!.....projects on hold mostly!
-
Qui-gon
- Silver Member
- Posts: 687
- Joined: Sat Feb 19, 2011 7:03 pm
- Location: Lantana, Fl.
Re: Valve stem seal replacement head on notes
Damn! Thought I got away with that one! Ok will photo the modified tool mañanaKen L. wrote:Pictures...Pictures... We need pictures of the modified tools.
Thanks
Ken L.
1975 GL1000 Sold!
1976 GL1000 "GL1's evil twin" Supercharged cafe racer. Build thread Here
1977 GL1000 Black sorta resto project!
Now in Florida working for a living Ugh!.....projects on hold mostly!
1976 GL1000 "GL1's evil twin" Supercharged cafe racer. Build thread Here
1977 GL1000 Black sorta resto project!
Now in Florida working for a living Ugh!.....projects on hold mostly!
-
Qui-gon
- Silver Member
- Posts: 687
- Joined: Sat Feb 19, 2011 7:03 pm
- Location: Lantana, Fl.
Re: Valve stem seal replacement head on notes
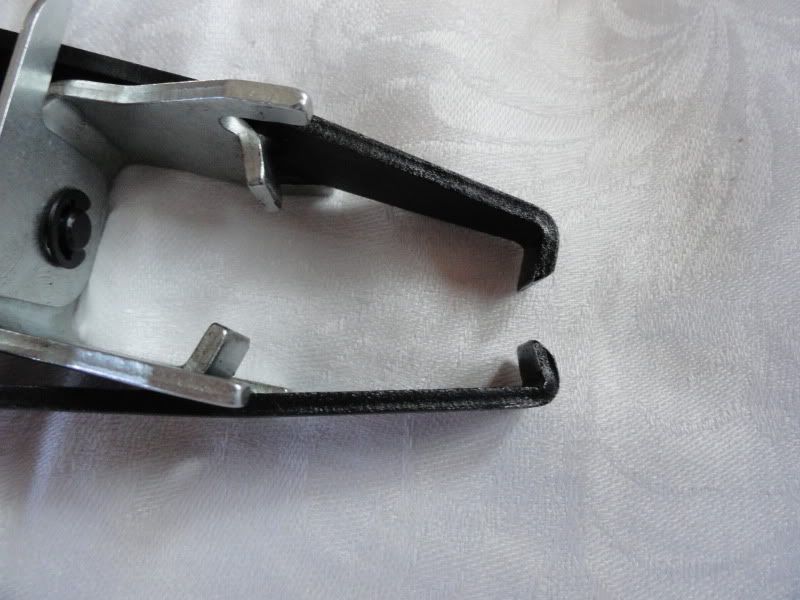
As requested....pictures of the modified tool.....I think this one is the HF one.
Completed tool with the 2 longer legs. Note the cool bolt we used! a manifold bolt and an acorn nut just fits:
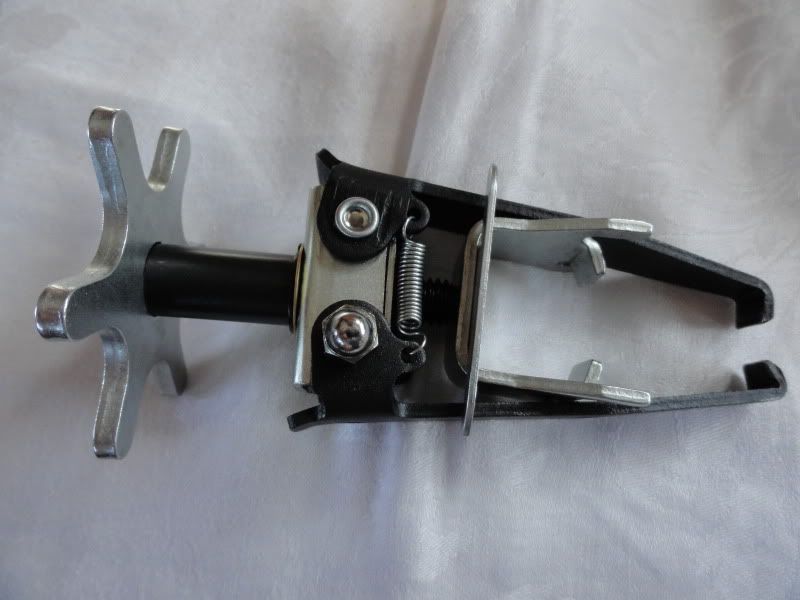
The legs...there is a slight difference in length. Also the jaws are a tad different:
Completed tool with the 2 longer legs. Note the cool bolt we used! a manifold bolt and an acorn nut just fits:
The legs...there is a slight difference in length. Also the jaws are a tad different:
1975 GL1000 Sold!
1976 GL1000 "GL1's evil twin" Supercharged cafe racer. Build thread Here
1977 GL1000 Black sorta resto project!
Now in Florida working for a living Ugh!.....projects on hold mostly!
1976 GL1000 "GL1's evil twin" Supercharged cafe racer. Build thread Here
1977 GL1000 Black sorta resto project!
Now in Florida working for a living Ugh!.....projects on hold mostly!
-
roachb

- Silver Member
- Posts: 801
- Joined: Wed Jul 09, 2008 3:48 pm
- Location: Salinas, CA
Re: Valve stem seal replacement head on notes
I got mine off with the HF tool but it was not ideal. Putting them back on was easier because I could put the long leg on the bottom of the springs and pop it out with a screwdriver when the spring was uncompressed. My heads were off.
The manual called the collet things "cotters".
The manual called the collet things "cotters".
RoachB
'75 GL 1000
'79 CM400T
"If you're going to repair a motorcycle, an adequate supply of gumption is the first and most important tool."
- Robert M. Pirsig
'75 GL 1000
'79 CM400T
"If you're going to repair a motorcycle, an adequate supply of gumption is the first and most important tool."
- Robert M. Pirsig
-
Qui-gon
- Silver Member
- Posts: 687
- Joined: Sat Feb 19, 2011 7:03 pm
- Location: Lantana, Fl.
Re: Valve stem seal replacement head on notes
Yes it cured the problem. No more oil smoke but the bike has other issues with it's EFI system. It looks like some PO must have bodged the throttle body linkage.dan filipi wrote:Did the new seals fix the smoking problem?
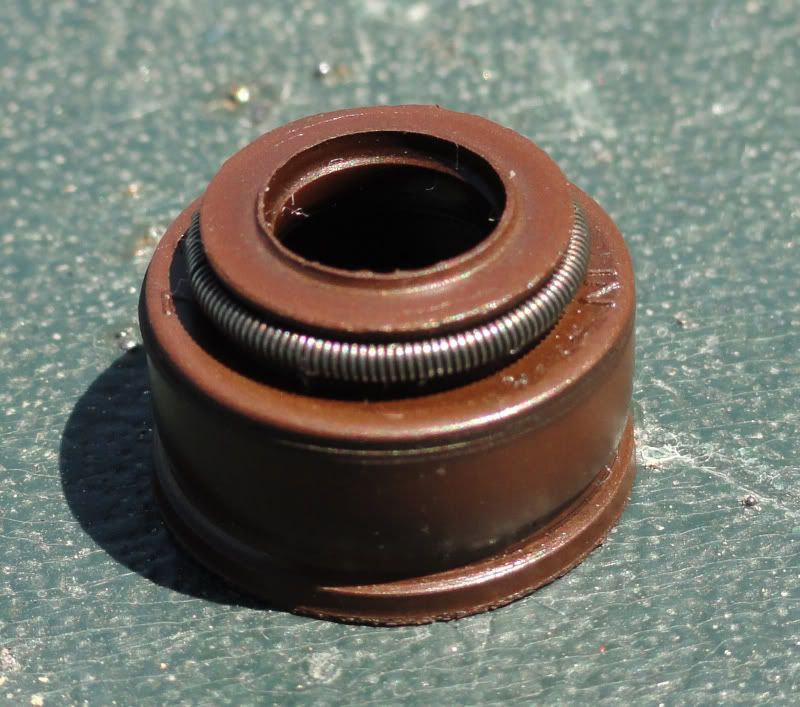
Here is a picture of an old seal. The camera is just about on its limit but it is possible to see the failed part of the seal. The crinkly bits around the top of the seal, where the valve stem goes, are hard and almost crispy!
Last edited by Qui-gon on Fri Aug 05, 2011 3:21 pm, edited 1 time in total.
1975 GL1000 Sold!
1976 GL1000 "GL1's evil twin" Supercharged cafe racer. Build thread Here
1977 GL1000 Black sorta resto project!
Now in Florida working for a living Ugh!.....projects on hold mostly!
1976 GL1000 "GL1's evil twin" Supercharged cafe racer. Build thread Here
1977 GL1000 Black sorta resto project!
Now in Florida working for a living Ugh!.....projects on hold mostly!
-
Qui-gon
- Silver Member
- Posts: 687
- Joined: Sat Feb 19, 2011 7:03 pm
- Location: Lantana, Fl.
Re: Valve stem seal replacement head on notes
Yeah I wondered about using the long leg that way but wanted to be sure I could get it back together again without removing the head. Of course with the head off you can use a conventional valve spring compressor. I guess the bottom line is 2 HF compressors will make 2 good ones that will do the job head on.roachb wrote:I got mine off with the HF tool but it was not ideal. Putting them back on was easier because I could put the long leg on the bottom of the springs and pop it out with a screwdriver when the spring was uncompressed. My heads were off.
The manual called the collet things "cotters".
1975 GL1000 Sold!
1976 GL1000 "GL1's evil twin" Supercharged cafe racer. Build thread Here
1977 GL1000 Black sorta resto project!
Now in Florida working for a living Ugh!.....projects on hold mostly!
1976 GL1000 "GL1's evil twin" Supercharged cafe racer. Build thread Here
1977 GL1000 Black sorta resto project!
Now in Florida working for a living Ugh!.....projects on hold mostly!
-
- Similar Topics
- Replies
- Views
- Last post
-
- 13 Replies
- 1096 Views
-
Last post by calif wingnut
-
- 4 Replies
- 357 Views
-
Last post by John Schmidt
-
- 3 Replies
- 296 Views
-
Last post by taunusrainer
-
- 7 Replies
- 977 Views
-
Last post by tlbranth
-
- 11 Replies
- 348 Views
-
Last post by Sidecar Bob